How To Encrypt Messages in ESP-NOW
2024-07-03 | By Maker.io Staff

A previous article discussed getting started with ESP-NOW, a straightforward, connectionless communication protocol for the ESP32 and ESP8266. In that article, the server broadcasts an unencrypted message to every client willing to read it, and the data is not protected. Therefore, this article demonstrates how a single server device can securely transmit data to multiple receivers using ESP-NOW’s built-in encryption scheme.
Finding the Device’s MAC Addresses
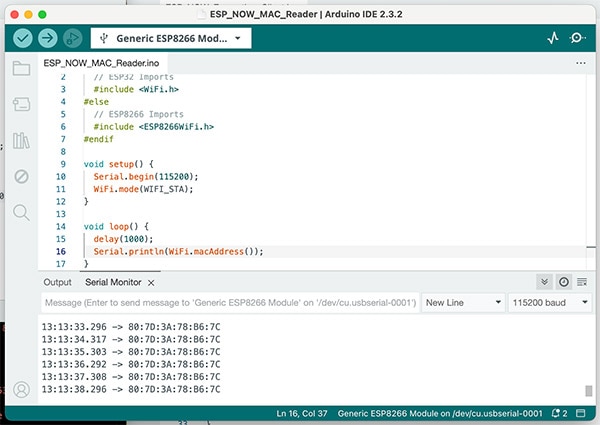
Messages in ESP-NOW can be encrypted when exchanging data between known peers. The server must know all peers that should receive a message, and each client must know the server from which the data comes. Therefore, you must first find the MAC address of each board involved in exchanging encrypted data. The following simple sketch outputs the address of an ESP32 or ESP8266 to the serial console in one-second intervals:
#ifdef ESP32
  // ESP32 Imports
  #include <WiFi.h>
#else
  // ESP8266 Imports
  #include <ESP8266WiFi.h>
#endif

void setup() {
  Serial.begin(115200);
  WiFi.mode(WIFI_STA);
}

void loop() {
  delay(1000);
  Serial.println(WiFi.macAddress());
}
It’s recommended to write down the MAC address of each board and choose one that will act as the server. In this case, all the others are receivers.
 This screenshot shows the output of the script when running it on one of the client boards.
Encryption Keys in ESP-NOW
ESP-NOW's encryption method requires that all involved parties know two secret keys. The first one is the sender's primary key. It is unique and shared between all boards to decrypt messages sent by the server. In addition, each client has a unique primary key, which must be hidden from the other clients. However, the server must know each client's key to encrypt messages so that only that client can restore the original contents.
While this method might initially seem overly complicated, it ensures that clients know that a message came from the server and that message contents are confidential and can only be read by the intended client, as long as the clients keep their key hidden from other clients.
The key can be any string consisting of printable characters as long as it's only 16 bytes. Usually, every 16-character string that contains only numbers and letters will work. However, you can use any simple online calculator to determine a string's length. The following snippet contains two example keys. The first one is the sender's primary key, and the second string is the receiver's local primary key:
static const char* PRIMARY_MASTER_KEY = "h=8:a2hC7/2/aF§";
static const char* LOCAL_MASTER_KEY = "u8/6&xF@M2??tJ1_";
Sending Encrypted Messages in ESP_NOW
Encrypting messages before sending them to peers involves the same steps as transmitting unencrypted messages. However, the server must register its primary master key before adding peers. Additionally, each peer’s local key needs to be announced when adding it. Unfortunately, the setup procedure differs between the ESP32 and ESP8266, as the ESP8266 doesn’t utilize the esp_now_peer_info_t structure. However, conceptually, the two setup methods perform the same tasks.
The first snippet shows the ESP8266’s import statements and variable definitions:
// ESP8266 Imports
#include <espnow.h>
#include <ESP8266WiFi.h>

#define UPDATE_DELAY 250
#define BUTTON_PIN 2
#define CHANNEL 1

static const char* PRIMARY_MASTER_KEY = "h=8:a2hC7/2/aF§";
static const char* LOCAL_MASTER_KEY = "u8/6&xF@M2??tJ1_";

uint8_t clientAddress[] = {0x80, 0x7D, 0x3A, 0x78, 0xB6, 0x7C};
unsigned long lastUpdateMillis = 0UL;
uint8_t flagToSend = 0;
The two char pointers contain the server's and client's keys. The clientAddress array holds the MAC address determined using the script from above. The lastUpdateMillis variable is used in the loop to let some time pass between transmitting messages, and the flagToSend represents the value sent to clients. The ESP32 code looks very similar, but it utilizes a structure for storing peer information:
// ESP32 Imports
#include <esp_now.h>
#include <WiFi.h>
#include <esp_wifi.h>

#define UPDATE_DELAY 250
#define BUTTON_PIN 2
#define CHANNEL 1

esp_now_peer_info_t peerInfo;

static const char* PRIMARY_MASTER_KEY = "h=8:a2hC7/2/aF§";
static const char* LOCAL_MASTER_KEY = "u8/6&xF@M2??tJ1_";

uint8_t clientAddress[] = {0x80, 0x7D, 0x3A, 0x78, 0xB6, 0x7C};
unsigned long lastUpdateMillis = 0UL;
uint8_t flagToSend = 0;
The ESP8266 setup function opens a serial connection, initializes the WiFi module, and starts ESP_NOW. It then instructs the device to act as a server. Next, the code defines that ESP_NOW should use the PRIMARY_MASTER_KEY to encrypt messages before adding the client with its personalized LOCAL_MASTER_KEY:
// ESP8266
void setup() {
  Serial.begin(9600);
  WiFi.mode(WIFI_STA);
  WiFi.disconnect();
  esp_now_init();
  esp_now_set_self_role(ESP_NOW_ROLE_CONTROLLER);
  esp_now_set_kok((uint8_t *) PRIMARY_MASTER_KEY, 16);
  esp_now_add_peer(clientAddress, ESP_NOW_ROLE_SLAVE, CHANNEL, (uint8_t *) LOCAL_MASTER_KEY, 16);
}
The ESP32 setup performs the same steps but uses the peerInfo structure to store peer data, including its personalized key. Additionally, the ESP32 version uses a different function name to set the key:
// ESP32
void setup() {
  Serial.begin(9600);
  WiFi.mode(WIFI_STA);
  esp_now_init();
  esp_now_set_pmk((uint8_t *) PRIMARY_MASTER_KEY);
  peerInfo.channel = CHANNEL;
  peerInfo.encrypt = true;
  memcpy(peerInfo.lmk, LOCAL_MASTER_KEY, 16);
  memcpy(peerInfo.peer_addr, clientAddress, 6);
  esp_now_add_peer(&peerInfo);
}
The remaining server-side code is equal on both platforms and does not differ from the example discussed in the previous article. It has two helper functions for deleting peers and sending data:
void deletePeer(void) {
  uint8_t delStatus = esp_now_del_peer(clientAddress);
  if (delStatus == 0) {
    Serial.println("Peer deleted");
  } else {
    Serial.println("Could not delete peer");
  }
}

void sendData(void) {
  uint8_t result = esp_now_send(clientAddress, &flagToSend, sizeof(flagToSend));
  if (result != 0) {
    Serial.println("Error sending data!");
    deletePeer();
  }
}
These helpers call the respective ESP_NOW functions and handle errors if something goes wrong. The server’s loop method periodically calls the two helper functions and transmits a connected button’s state to the clients. ESP_NOW handles encryption calculations, so you don’t have to know the nitty-gritty details:
void loop() {
  unsigned long currentMillis = millis();
  if (currentMillis - lastUpdateMillis >= UPDATE_DELAY) {
    // flagToSend = digitalRead(BUTTON_PIN);
    flagToSend = !flagToSend;
    if (esp_now_is_peer_exist(clientAddress)) {
      sendData();
    }
    lastUpdateMillis = currentMillis;
  }
}
Receiving and Decrypting Secret Messages
Similar to the server code, the client’s import statements and variable definitions slightly differ based on the target platform. An ESP8266-based client’s imports and variables look as follows:
// ESP8266 Imports
#include <espnow.h>
#include <ESP8266WiFi.h>

#define CHANNEL 1
#define LED_PIN LED_BUILTIN
#define UPDATE_DELAY 50

static const char* PRIMARY_MASTER_KEY = "h=8:a2hC7/2/aF§";
static const char* LOCAL_MASTER_KEY = "u8/6&xF@M2??tJ1_";

uint8_t controllerAddress[] = {0xBC, 0xDD, 0xC2, 0xB5, 0xE4, 0xC1};
bool receivedFlag = false;
unsigned long lastUpdateMillis = 0UL;
Note that it contains the same keys as the master. However, the MAC address is the server’s unique address. Similar to before, an ESP32-based client has an additional peerInfo variable that contains the server’s information:
// ESP32 Imports
#include <esp_now.h>
#include <WiFi.h>

#define CHANNEL 1
#define LED_PIN LED_BUILTIN
#define UPDATE_DELAY 50

esp_now_peer_info_t peerInfo;

static const char* PRIMARY_MASTER_KEY = "h=8:a2hC7/2/aF§";
static const char* LOCAL_MASTER_KEY = "u8/6&xF@M2??tJ1_";

uint8_t controllerAddress[] = {0xBC, 0xDD, 0xC2, 0xB5, 0xE4, 0xC1};
bool receivedFlag = false;
unsigned long lastUpdateMillis = 0UL;
Similarly, the setup functions differ slightly depending on the target platform. The ESP8266’s setup method looks as follows:
// ESP8266
void setup() {
  WiFi.mode(WIFI_STA);
  WiFi.disconnect();
  esp_now_init();
  esp_now_set_self_role(ESP_NOW_ROLE_SLAVE);
  esp_now_set_kok((uint8_t *) PRIMARY_MASTER_KEY, 16);
  esp_now_add_peer(controllerAddress, ESP_NOW_ROLE_CONTROLLER, CHANNEL, (uint8_t *) LOCAL_MASTER_KEY, 16);
  esp_now_register_recv_cb(onDataReceived);
}
Like the server code, the client initializes its WiFi module and ESP_NOW. The method then instructs the board to act as an ESP_NOW client before setting the server's master encryption key. Note that the client must also add the server as a peer. However, clients must add the server using the ESP_NOW_ROLE_CONTROLLER role and link the local key. It's crucial that the calls happen in this order and the keys are passed as demonstrated to ensure that the client can decipher incoming messages. Finally, the setup function defines the callback to use whenever the client receives data.
The ESP32 version looks similar. However, just like with the server code, the ESP32 client program uses different calls to set the keys, and it additionally utilizes the peerInfo struct to store the server details, such as its MAC address and master key:
// ESP32
void setup() {
  WiFi.mode(WIFI_STA);
  esp_now_init();
  esp_now_set_pmk((uint8_t *) PRIMARY_MASTER_KEY);
  peerInfo.channel = CHANNEL;
  peerInfo.encrypt = true;
  memcpy(peerInfo.lmk, LOCAL_MASTER_KEY, 16);
  memcpy(peerInfo.peer_addr, controllerAddress, 6);
  esp_now_add_peer(&peerInfo);
  esp_now_register_recv_cb(onDataReceived);
}
The callback function also differs slightly between the platforms. Both versions store the received data in the receivedFlag variable, and the loop method toggles the onboard LED based on the received value:
void loop() {
  unsigned long currentMillis = millis();
  if (currentMillis - lastUpdateMillis >= UPDATE_DELAY) {
    digitalWrite(LED_PIN, receivedFlag);
    lastUpdateMillis = currentMillis;
  }
}

// ESP32
void onDataReceived(const uint8_t *mac_addr, const uint8_t *data, int data_len) {
  receivedFlag = *data;
}

// ESP8266
void onDataReceived(uint8_t *mac_addr, uint8_t *data, uint8_t data_len) {
  receivedFlag = *data;
}
As with the server, the underlying ESP_NOW service decrypts the received data using the previously set keys.
Summary
Encryption ensures confidentiality and authenticity between known peers in ESP-NOW. Clients can be confident that they receive data only from a trustworthy server, and the senders can ensure that only the intended recipient can decipher an encrypted message. For that purpose, all clients must know the server address and its primary key. Similarly, the server must know all client addresses and their encryption keys. However, all clients must keep their keys hidden from the other clients to ensure confidentiality.
The setup code for both the server and clients looks similar to the simple broadcast case. However, all participants must register their primary key as the master key before adding peers. Additionally, they must add all other known peers with their respective keys. In the server’s case, the program adds all known clients and their keys as peers. Similarly, each client adds the server and its key to its list of known peers.
Data transmission and retrieval remain unchanged from the unencrypted program, as the ESP-NOW service hides the nitty-gritty details underneath an abstraction layer.

Have questions or comments? Continue the conversation on TechForum, DigiKey's online community and technical resource.
Visit TechForum


 中国
中国