制造商零件编号 SC0384
SBC 1.8GHZ 4 CORE 4GB RAM
Raspberry Pi
The Raspberry Pi is a versatile device that comes in various form factors and can be used in many projects, from miniaturized embedded applications to dedicated media-streaming centers. However, many of these applications expect the computer to perform some operations, such as running a user script or updating a program, in scheduled intervals or when certain events occur - for example when the system boots up. This article outlines the basics users need to know to schedule tasks on their Raspberry Pi and many other computers running a Linux-based OS.
Cron is a popular scheduling tool that typically comes pre-installed with many Linux-based operating systems. This utility keeps a list of scheduled jobs and tasks, which it stores in the cron file. The scheduled jobs are called cron jobs. The cron daemon is a background task that runs on the Raspberry Pi and checks the crontab file for jobs to plan. Note that cron executes the jobs with the same privileges as the user who added the jobs. For example, if the pi user adds a cronjob, the scheduler will run the job as if it were the pi user. Therefore, the root user must add jobs that require root privileges.
While the crontab file might initially sound complicated, it just contains clear-text entries representing the cron jobs to schedule. These entries must follow a particular syntax for the cron daemon to recognize them correctly. Each cron job entry in the crontab comprises six parts, separated by single whitespaces:

Note that the day of the week starts with Sunday, which also occurs twice (0 or 7). Alternatively, you can also type out the first three characters of a weekday or month (e.g., Mon or Wed). As discussed below, you can fill in the first variables with concrete values or wildcards. When using exact values, a scheduled job will run at a specific time on one particular day of the year. For example, the following command will execute script.sh every first of each month at 10 PM:
0 22 1 * * /users/pi/script.sh
The crontab entry sets the minute, hour, and day variables to exact values: zero, 22 (10 PM), and one, respectively, which means that the script runs whenever all three of these conditions are met. However, the entry utilizes the asterisk wildcard for the month and day-of-week variables, suggesting that these variables don’t influence the scheduling of the script. For example, the following line makes a script run every minute:
* * * * * /users/pi/script.sh
Next, it’s also possible to define value ranges and comma-separated lists of values.
0 0,6,12,18 * * 1-5 /users/pi/script.sh
The comma-separated list supplied for the hours part of the command ensures that the script runs at 12 AM, 6 AM, 12 PM, and 6 PM. The zero provided for the minutes ensures that the script runs once at the beginning of every specified hour, and the range supplied for the days makes the script run only on the first five days of the week.
Another common option to supply is the step operator, which makes a script run in certain intervals, for example, once every ten minutes:
*/10 * * * * /users/pi/script.sh
Note that you could achieve the same result using the comma-separated list from above. ;However, the step-operator is a shorthand that makes the cron jobs easier to read:
0,10,20,30,40,50 * * * * /users/pi/script.sh
Finally, there are a few handy shorthand commands that will make cron execute a script or command at predefined events, for example, on system reboot or once every year:
@reboot /users/pi/script.sh
@annually /users/pi/script.sh
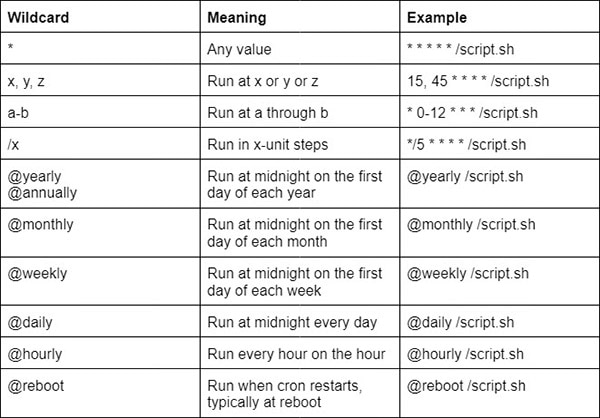
The following table summarizes all available options:

Adding a job to the crontab can be done with the following command:
crontab -e
As mentioned, the jobs will run with the privileges of the user who added them to the cron file. In addition, it’s also possible to specify the user privileges when editing the crontab by using the following parameter:
crontab -u [username] -e
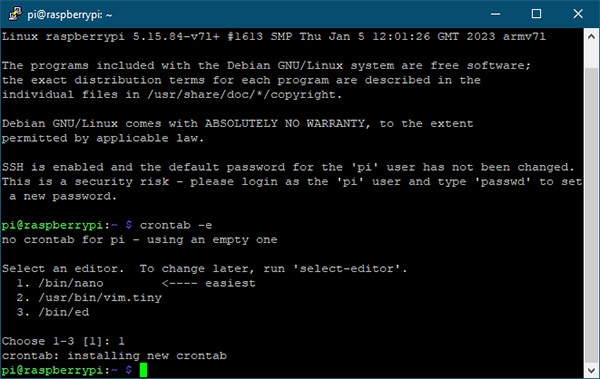
Specifying which editor to use when first editing the cron file is necessary. The selection can be made by typing one of the allowed numbers. Beginners should use nano, as it is the most straightforward of the available editors:
 Type 1 to open the cron file in nano.
Then, in the file, add the cron jobs as described above, one job per line:
 Add one cron job per line. You can also write comments that describe the jobs for later reference.
Finally, save the file, and the cron daemon will run the jobs once the file is saved. When using nano, press Ctrl + O and then use the enter key to write the changes to the file. Then, hold down the Ctrl key and press X to exit the editor. The cron daemon should confirm that it detected new jobs in the file:
 Once saved, the cron daemon should automatically install the new cron file.
Setting up scheduled jobs on a Raspberry Pi is a breeze once users understand the cron file and its associated cron jobs. The jobs are simple text commands that reside in the cron file. Each cron job definition consists of five numeric values that let the cron daemon know when to run the job, and the sixth parameter contains the command to run. Remember that the jobs will always run with the privilege of the user that entered them. Alternatively, it’s possible to state a user when running crontab.