How to Use a CCS811 Air Quality Sensor
2021-11-10 | By Maker.io Staff
Indoor air quality sensing is an important feature found in many consumer products, such as automatic HVAC systems. These often tiny sensors can precisely detect harmful VOCs (Volatile Organic Compounds) and other harmful gasses such as CO2 (Carbon Dioxide). In this guide, learn about the Adafruit CCS811 breakout module features that will help you implement it into your next Arduino-based DIY project!
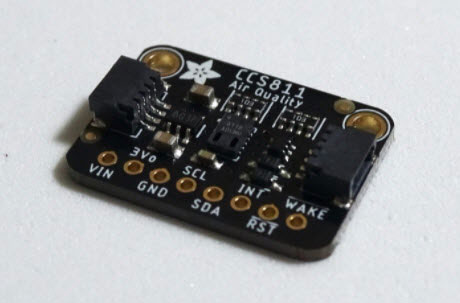
 The Adafruit CCS811 Air Quality sensor with StemmaQt headers.
Sensor Specifications and Features
The CCS811 is a heated-plate metal oxide sensor that incorporates a small microcontroller responsible for driving and controlling the sensor itself. Apart from that, the built-in MCU also interprets the sensor readings and makes them accessible via an I2C interface for easy communication with other devices, such as an Arduino. Note that the CCS811 uses I2C clock stretching, which may cause problems and performance issues with some development boards, such as the Raspberry Pi.
The CCS811 measures the eCO2 (equivalent calculated Carbon Dioxide) concentration within 400 to 8192 ppm and TVOC (Total Volatile Organic Compounds) within a range of zero to 1187 ppb. This sensor can detect ethanol, methanol, aldehydes, ketones, organic acids, aliphatic and aromatic hydrocarbons, and amines.
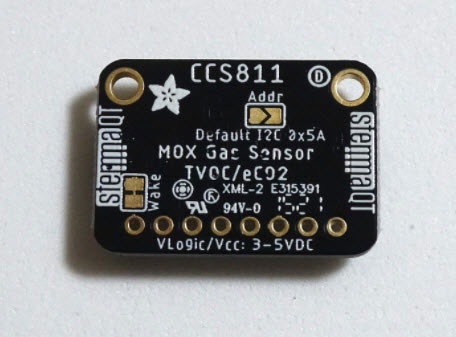
 The underside of the module lists a few details. It also exposes two jumper pads that allow you to change some settings.
When the sensor is first received, it should be run for around 48 hours because the sensitivity levels of the sensor might change during the first operational hours. It should also be calibrated against known sources, such as calibration gas, to achieve maximum precision. However, the sensor comes calibrated from the factory, which is acceptable for DIY applications.
The Adafruit CCS811 breakout comes with a 3.3V regulator on board, meaning you can employ the CCS811 in 3.3V and 5V projects without requiring an external regulator. Note that early versions of the CCS811 incorporated an internal thermistor for temperature sensing, but this was removed in later revisions.
Hookup Guide
You can group the I/O pins of the Adafruit CCS811 breakout module into three categories. The first category contains the power pins. VIN is the module’s voltage supply, which works with any voltage between 3.3V and 5V. GND is the common ground for power and logic. Last, 3V3 supplies 3.3V of output from the onboard regulator. You can safely draw up to 100mA from this pin.
The second category contains the I2C communication pins SCL and SDA. These connect to the SCL and SDA pins of your microcontroller or development board. The I2C pins are also 3V and 5V compliant.
The last category contains three more pins. INT is an interrupt output pin that the sensor uses to signal that a new reading is ready, or when the sensor detects a dangerous condition. The WAKE pin enables or disables the sensor. Pull it low to turn on the sensor. The stemma QT version of this breakout board already ties this pin to GND internally, so you can leave this pin floating unless the wake jumper on the underside of the board has been severed. The RST pin allows you to reset the sensor by pulling the pin low. The INT pin is only 3V compliant, while the other two pins can take 3V to 5V.
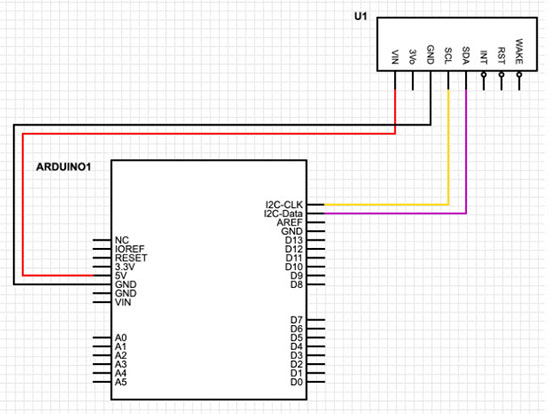
 Connect your Adafruit CCS811 breakout board to your Arduino board as shown in this schematic.
Read the CCS811 Using the Arduino IDE
Start by installing the Adafruit_CCS811 library using the Arduino IDE’s library manager. You should then be able to determine the air quality:
Copy Code
#include "Adafruit_CCS811.h"

// Create the sensor object
Adafruit_CCS811 sensor;

unsigned long lastRead = 0UL;

void setup()
{
  // Open a serial connection
  Serial.begin(9600);

  // Initialize the sensor and wait for it to start
  if(!sensor.begin())
  {
	Serial.println("Failed to start the CCS811 sensor! Please check your wiring.");
	while(1);
  }

  // Wait for the sensor to be ready
  while(!sensor.available());
}

void loop()
{
  // Read the sensor every 500 milliseconds
  if(millis() - lastRead > 500)
  {
	// Check, whether the sensor is available and ready
	if(sensor.available())
	{
  	// Try to read some data. The if checks whether that
  	// process was successful
  	if(!sensor.readData())
  	{
    	// If the sensor succeeded, output the measured values

    	Serial.print("CO2: ");
    	Serial.print(sensor.geteCO2());
    	Serial.print("ppm, TVOC: ");
    	Serial.print(sensor.getTVOC());
    	Serial.println("ppb.");
  	}
  	else
  	{
    	// Otherwise, display that an error occured
    	Serial.println("Error!");
  	}
	}
  }
}
As shown above, the setup() method initializes the serial interface and the CCS811 breakout module. After that, it checks whether the initialization process was successful. The loop function first determines how much time has elapsed since it last read the sensor values. If more than half a second has passed, the method requests the current sensor readings from the breakout module. If the request is successful, the program outputs the current sensor values to the serial console. Otherwise, it prints an error message.
Summary
The CCS811 is an impressive and tiny air quality sensor, and the Adafruit CCS811 breakout module makes it easy to access in DIY projects. Thanks to its small size, you can easily include this module in almost any DIY project. On the stemma QT version of this board, you only need to connect the power pins and the I2C communication lines to get the module up and running. The regular breakout module also requires you to pull the WAKE pin low to activate the module. You can communicate with the sensor using an easy-to-use Arduino library.
Have questions or comments? Continue the conversation on TechForum, DigiKey's online community and technical resource.


