How to Add Capacitive Sensing to Any Arduino Project
2021-04-07 | By Maker.io Staff
Touch screens have become an increasingly popular input method over the last decade, and it’s easy to see why. Touch inputs allow users to employ their fingers to interact with an electronic device. This leads to input methods that are very easy to understand, and even children can quickly understand them and learn how to interact with an electronic device. This article discusses two ways of adding capacitive touch inputs to any of your Arduino-based DIY projects.
How Does It Work?
Capacitive sensors are proximity sensing devices that can detect a user’s finger, for example, without the need for physical contact. Prominent examples are touch screens and various touch controls - one popular recent example is on modern cooktops. However, that’s just a handful of visible applications. Capacitive sensors can be hidden in other devices so that they aren’t inherently visible to the user.
As the name implies, a capacitive sensor acts like a simple capacitor. A piece of metal internally connects to an oscillator circuit. Unlike a pre-built capacitor, the target to be sensed (for example, a user’s finger) acts as the second plate of the capacitive sensor. In this article, an Arduino takes the role of the previously mentioned oscillator circuit. The Arduino periodically sends out pulses and measures how much time elapses until it receives a response. When the target comes closer to the piece of metal that forms the first plate of the sensor, the Arduino can detect a change in the timing and use that information to determine whether a user made a touch input.
Note that this is a short and simplified description of the working principle of such a sensor. Furthermore, many aspects determine how well the sensing works - two of which are the size of the first metal plate and the surface area of the target object.
Capacitive Sensing: The Cost-Effective Way
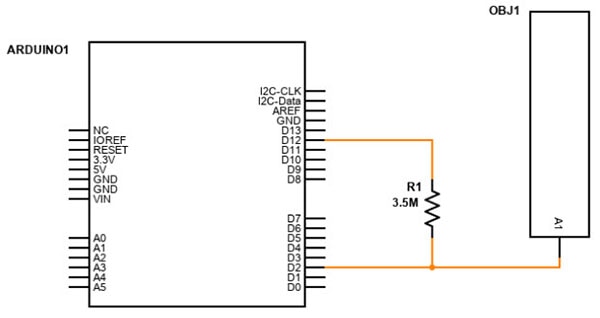
We only need a conductive object to form one plate of the sensor, an Arduino, a relatively large value resistor, and a few jumper wires to build a simple capacitive proximity sensor. The resistor connects D2 and D12 of the Arduino. Additionally, pin D2 also connects one side of the resistor to a metal object such as a paperclip, a piece of aluminum foil, or a tool:
The software part of this project uses an Arduino library that sends out pulses and measures how long it takes to receive an answer. The library takes care of normalizing the result, and it returns an arbitrary number that describes the sensed capacitance. The sketch for this example only contains a few lines of code:
#include <CapacitiveSensor.h>

CapacitiveSensor sensor = CapacitiveSensor(2,12);

void setup()
{
  Serial.begin(9600);

  // Disable the automatic re-calibration feature of the
  // capacitive sensor library
  sensor.set_CS_AutocaL_Millis(0xFFFFFFFF);
}

void loop()
{
  long current_millis = millis();
  long capacitance = sensor.capacitiveSensor(30);

  // Print the result of the sensor reading
  // Note that the capacitance value is an arbitrary number
  // See: https://playground.arduino.cc/Main/CapacitiveSensor/ for details
  Serial.println(capacitance);

  // Wait for 50 milliseconds
  while(millis() - current_millis < 50);
}
The setup method turns on the serial port for debugging, and it then deactivates the automatic re-calibration feature of the CapacitiveSensor library. Please review the library’s documentation for further details.
The loop method uses the library’s capacitiveSensor function to obtain a capacitance reading. Note that the result is an arbitrary value that correlates to how close a user comes to the metal object. The loop method then prints that value to the serial console before it repeats these steps after a 50-millisecond delay.
The Arduino IDE's serial plotter is a useful tool for visualizing the output:

As the figure shows, the curve significantly changes when I move my hand closer to the piece of metal or farther away from it. Experimenting with different conductive materials and resistor values can drastically change how well the circuit detects a user's finger.
A More Advanced Approach
This method already yields rather good results. It, however, sometimes also delivers wrong results and somewhat inaccurate readings. This simple approach might be alright for scenarios where, for example, you only want to sense whether a user brings his or her finger close enough to the sensor to activate it. The previously discussed method heavily depends on many factors such as the size of the plate and the temperature.
Dedicated touch and proximity sensors are a great way to guarantee consistent sensor readings in many applications. Therefore, these sensor boards are a sensible alternative to the simple homemade experimental approach discussed above. The downsides of such external sensor modules are the increased size, complexity, and higher price. Therefore, you have to carefully evaluate what the most important aspects of your project are and what you’d like to focus on.
Summary
Capacitive proximity and touch sensors represent great for adding engaging and intuitive input options to DIY projects. As the name suggests, a capacitive sensor is nothing more at its core than a simple capacitor. One plate of the capacitor consists of a fixed conductive object, such as a metal strip. A target object, such as a user’s finger, forms the other plate. An Arduino sends out pulses and measures how long it takes until the software reports a response. The Arduino can then translate this delay to a proximity value. In its simplest form, a home-made sensor can deliver good results when tweaked appropriately for some applications. A dedicated proximity sensor board can achieve better results. Choosing to add an additional board, however, also increases the overall size, complexity, and cost of a project.

Have questions or comments? Continue the conversation on TechForum, DigiKey's online community and technical resource.
Visit TechForum


 中国
中国