Getting Started with the MCP9808 Temperature Sensor Breakout Module
2021-11-03 | By Maker.io Staff
The MCP9808 is a versatile and accurate temperature sensor with a wide operating range ideal for most everyday applications. The sensor uses standard I2C, making it suitable for use with almost every microcontroller and development board you come across. This article discusses how to connect and use the Adafruit MCP9808 breakout module to employ this temperature sensor in your custom DIY projects in practically no time.
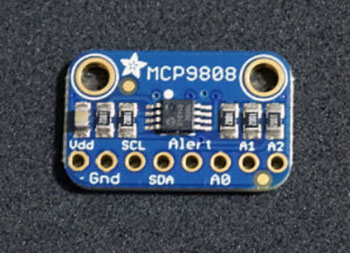
 The MCP9808 breakout board comes in a small package, making it easy to add to almost any existing or new DIY project.
Specifications and Special Features of the MCP9808
The MCP9808 can operate over a temperature range of -40°C to +125°C (-40°F to +257°F) while simultaneously offering exceptional accuracy of around a quarter degree Celsius (0.45°F). As previously mentioned, the device uses I2C, allowing it to communicate with practically every commonly used development board. The Adafruit MCP9808 breakout also offers three configurable address pins that make it possible to connect up to eight MCP9808 modules to a single I2C bus. The wide range of supported supply voltages and the low current consumption of 200µA make this board a great choice in a wide range of projects.
Connecting the MCP9808 to an Arduino
Connecting this module to an Arduino (or any other development board) requires only four wires. This breakout board works with any voltage (logic and supply) between 2.7V and 5.5V. Two of those wires supply power to the board, the other two act as communication lines:
 The MCP9808 breakout board only needs four wires to communicate with the Arduino. VDD and GND supply power to the board. SCL and SDA are the I2C communication lines.
The Adafruit MCP9808 breakout module allows you to select its I2C address by applying logic-level signals to the address pins A0, A1, and A2. Thanks to the built-in pull-down resistors, however, you can also leave these pins floating. Doing so will make the device use its standard I2C address.
The MCP9808 can send an interrupt signal as soon as it measures a temperature outside of a programmable region. If the device detects an out-of-bounds value, it can send an interrupt signal over its alert pin. Note that to use this pin, you’ll need to add an external pull-up resistor.
Selecting the I2C Address
As previously mentioned, the device will use its standard I2C address when all address pins are left floating. This base address is 0x18. If you tie address pin zero to VDD, the device increments its base I2C address by one, and the module’s new address will be 0x19. If you connect A1 to VDD, the device adds two to its base address. Tying A2 to VDD causes the module to increase its base address by three. You can use all three address pins to create up to eight different I2C addresses:

Source Code for Interfacing the MCP9808
The Adafruit MCP9808 module has a ready-to-use Arduino library that allows you to conveniently download and install using the Arduino IDE. To get started with the MCP9808 using the Arduino IDE, open the IDE’s library manager and install the ‘Adafruit MCP9808’ library package. You should then be able to compile and upload the following test program that periodically requests the current temperature from the breakout module:
#include <Wire.h>
#include "Adafruit_MCP9808.h"

// Create the MCP9808 temperature sensor object
Adafruit_MCP9808 sensor = Adafruit_MCP9808();
unsigned long lastRead = 0;

void setup()
{
  Serial.begin(9600);

  // Check, whether the sensor is connected to the Arduino
  // and whether it works as intended.
  if (!sensor.begin(0x18))
  {
	Serial.println("Unable to connect to the MCP9808 breakout board!");
	Serial.println("Check your connections and verify the address is correct.");
	while (1);
  }

  Serial.println("MCP9808 initialized!");

   // Wake up the sensor from its sleep mode
  Serial.println("Waking up MCP9808.... ");
  sensor.wake();

  // You can use the following function to put the sensor back to sleep:
  // sensor.shutdown_wake(1);

  // Mode Resolution SampleTime
  //  0	0.5°C   	30 ms
  //  1	0.25°C  	65 ms
  //  2	0.125°C 	130 ms
  //  3	0.0625°C	250 ms
  sensor.setResolution(1);
}

void loop()
{
  if(millis() - lastRead > 2000)
  {
	// Read the temperature and show the result:
	float temp_c = sensor.readTempC();
	float temp_f = sensor.readTempF();

	Serial.print("Temperature: ");
	Serial.print(temp_c, 2);
	Serial.print("°C (");
	Serial.print(temp_f, 2);
	Serial.println("°F)");

	lastRead = millis();
  }
}
After opening a serial connection, the setup()-method tries initializing the MCP9808 breakout board. For that, you must supply the begin()-function with the I2C address of the sensor you want to initialize. In this case, I left all address pins floating and thus supplied the default I2C address. Next, the setup()-method wakes up the MCP9808 from its sleep mode. You can put the sensor in its low-power sleep mode by calling the shutdown_wake()-function, as indicated by the comment in the source-code listing. Last, the setup()-method sets the sensor resolution. In this example, I used mode one, so the sensor will read the temperature with an accuracy of 0.25 degrees, and it takes the sensor 65 milliseconds to complete the reading.
The loop method then requests a temperature reading from the sensor and outputs the result to the serial console. It repeats the request every two seconds:
 A screenshot of the debug console. As shown, the MCP9808 measures the temperature with the previously set resolution.
Summary
 The breakout board is about as small as a one-dollar coin.
The MCP9808 is a useful temperature sensor with a large operating range and high accuracy. The sensor can handle temperatures between -40°C and +125°C with an accuracy of +/- 0.25°C. Thanks to the I2C interface, you can use this tiny module with practically any recent development board and microcontroller. To use it with an Arduino, connect the supply pins and the I2C communication lines. Three optional address pins allow you to connect up to eight MCP9808 modules to a single I2C bus. The Adafruit MCP9808 module comes with an Arduino library that makes it possible to get the module up and running in no time!

Have questions or comments? Continue the conversation on TechForum, DigiKey's online community and technical resource.
Visit TechForum


 中国
中国