How to Test Projects In Eclipse
2018-06-11 | By Maker.io Staff
Testing projects is a very important step in trying to determine if everything is running as expected. In this article, we will learn how to compile code for the Arduino using Eclipse, as well as how the serial port can be a useful tool for debugging.
Things You Will Need
- Arduino Uno
- Eclipse with Arduino
- RealTerm or other serial monitoring software
Compiling Arduino Code in Eclipse
In a previous how-to article, we learned how to install the Arduino library in Eclipse. One useful feature of Eclipse that is not strongly supported in the Arduino IDE is the use of external files, which can hold configuration code, simple routines, and even entire sections of code. External files, however, can also be used to test functions, which perform basic test routines. So, let’s take a simple example of a function that we wish to make and design a testing function for it.
Our job will be to create a simple string comparison function that takes two strings. It will then return a 1 if they are equal and a 0 if they are not. So, the code below shows the proposed function that will accomplish just this. In our project, we will put this code in an external file called “sCompare.h”, and this will be included in our main cpp file (called “ArduinoProject.cpp”).
- #ifndef SCOMPARE_H
- #define SCOMPARE_H
- // Proposed String Comparison Function
- int stringCompare(char *string1, char *string2)
- {
- int result = 1;
- int position = 0;
- while((string1[position] | string2[position]) != NULL)
- {
- // Test to see if the characters are the same
- if(string1[position] != string2[position])
- {
- result = 0;
- break;
- }
- else
- {
- // If they are equivalent and equal to NULL then end of string :)
- if(string1[position] == NULL)
- {
- break;
- }
- }
- position ++;
- }
- return result;
- }
- #endif
At this point, we might believe this function works, but how would we know without testing? And how could you test this on an Arduino? One method is to use I/O devices to show the result of the functions, so we will take advantage of the Arduinos inbuilt LED (found on pin 13), which should turn on if the string comparison function passes a testing procedure.
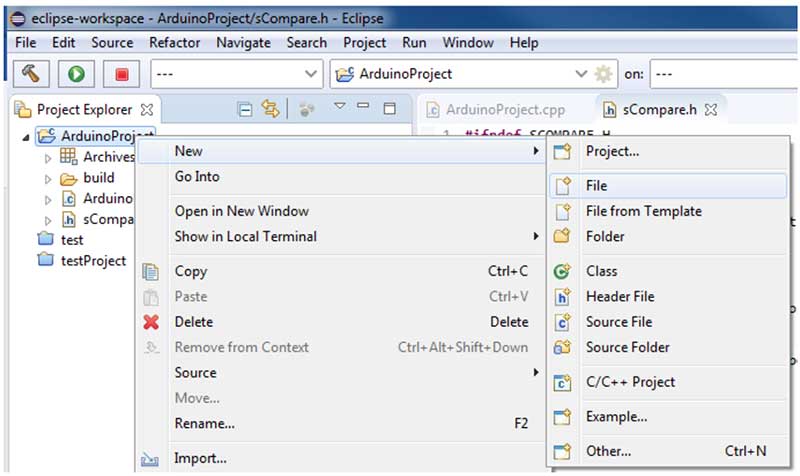
To create our testing procedure, we need to make an external header file called “tester.h” and then create a function that returns a 1 if the procedure was successful or a 0 if not. To do this, right-click the project in the project explorer and then click New > File.

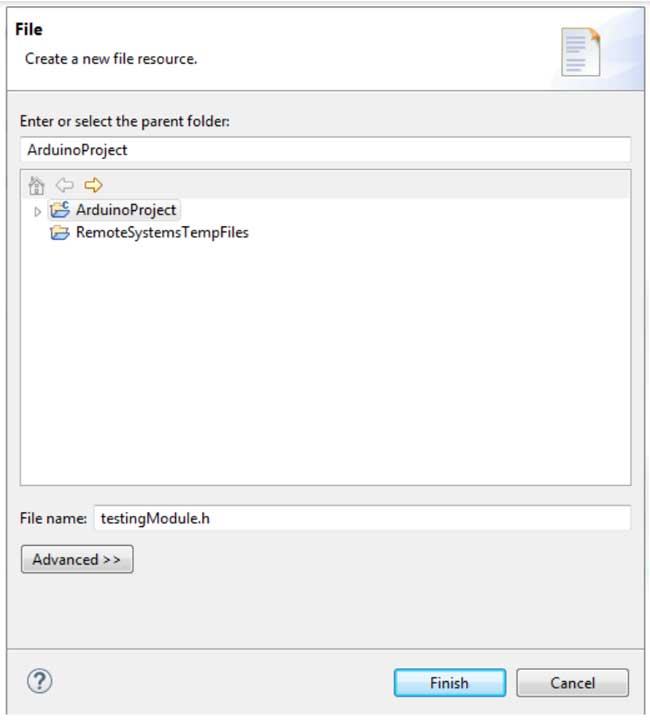
In the window that appears, we will call our file name “testingModule.h” and then click “Finish” to create and add the file to our project.

In our newly created file, we will add guards to our header file before writing and/or compiling any code. Guards in a header file prevent it from being repeated multiple times if included more than once (which prevents redefinition errors).
- #ifndef TESTMODULE_H
- #define TESTMOUDLE_H
- #endif
Now it's time to create our testing function! Before we create our test function, we will need to include the string comparison function. To do that, we include the file.
- #include "sCompare.h"
Next, we need to create a test function. This will be called “testStringCompare”, which returns an integer and will have no arguments passed.
- int testStringCompare(void)
- {
- }
Now it's time to code the testing function. When creating a testing function, it helps to keep it as simple as possible; otherwise, your testing function may have errors, which will be difficult to find. In this example, we will simply create three variables, which will test three different conditions that need to all be met for the test function to return a 1 (sCompare passed). Otherwise, the function will return a 0 (sCompare failed). Below is the complete “testingModule.h” file
- #ifndef TESTMODULE_H
- #define TESTMOUDLE_H
- #include "sCompare.h"
- int testStringCompare(void)
- {
- int tests[3] = {0, 0, 0};
- tests[0] = stringCompare("Hello", "Hello"); // Tests for equal strings
- tests[1] = stringCompare("Dello", "Hello"); // Tests for Dissimilar strings
- tests[2] = stringCompare("Hel", "Hello"); // Tests for partly equal strings
- if(tests[0] == 1 && tests[1] == 0 && tests[2] == 0)
- {
- return 1;
- }
- else
- {
- return 0;
- }
- }
- #endif
Let’s head back to our main code. We put our testing function in the setup function that only gets called once, and we use an if statement to turn the LED either on or off, depending on the results of the tests.
- void setup()
- {
- pinMode(13, OUTPUT); // Make the LED pin an output
- if(testStringCompare() == 1)
- digitalWrite(13, 1);
- else
- digitalWrite(13, 0);
- }
When the project is built and executed, the LED turns on, indicating that the test function has determined the StringComparison works!
Debugging the Arduino
The Arduino is a very useful prototyping tool for hobbyists and professionals alike, thanks to its easy-to-use libraries and the fact that it can be programmed using a standard USB port. However, because the Arduino does not use a dedicated programmer, it does not support debugging. So, finding problems with programs can be challenging.
One workaround is to use the Arduino’s serial port as an output for a serial monitor. From there, we can output variable values and try to understand how our code is behaving. Following from the previous example, we will include a serial output that will print the contents of string matches and test values to further confirm that our code produces the correct result.
- #ifndef TESTMODULE_H
- #define TESTMOUDLE_H
- #include <arduino.h></arduino.h>
- #include "sCompare.h"
- int testStringCompare(void)
- {
- int tests[3] = {0, 0, 0};
- delay(2000);
- tests[0] = stringCompare("Hello", "Hello"); // Tests for equal strings
- tests[1] = stringCompare("Dello", "Hello"); // Tests for Dissimilar strings
- tests[2] = stringCompare("Hel", "Hello"); // Tests for partly equal strings
- Serial.begin(9600);
- dely(500);
- a
- // Print results of test 1
- Serial.print("Test 1: ");
- Serial.print(tests[0]);
- Serial.println(" ");
- // Print results of test 2
- Serial.print("Test 2: ");
- Serial.print(tests[1]);
- Serial.println(" ");
- // Print results of test 3
- Serial.print("Test 3: ");
- Serial.print(tests[2]);
- Serial.println(" ");
- if(tests[0] == 1 && tests[1] == 0 && tests[2] == 0)
- {
- Serial.println("TEST OK");
- return 1;
- }
- else
- {
- Serial.println("TEST FAIL");
- return 0;
- }
- }
- #endif
The output can be seen on a terminal window, which shows the result of each function, confirming that both the test function and the string comparison function have worked as expected.

Conclusion
Testing projects can be tricky using the Arduino, but using testing modules and the serial port can provide valuable insight into the code. Just remember that the programmer also needs the serial port. Be sure to close the port after checking the result of the program so Eclipse can use the serial port to reprogram the device.

Have questions or comments? Continue the conversation on TechForum, DigiKey's online community and technical resource.
Visit TechForum


 中国
中国