制造商零件编号 SC0022
SBC 1.2GHZ 4 CORE 1GB RAM
Raspberry Pi
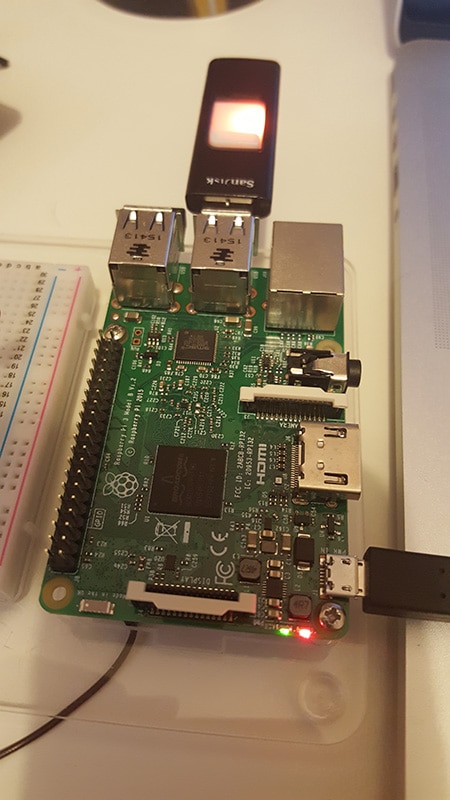
The Raspberry Pi team has now taken a leaf out of BerryBoot, a universal OS that allows you to boot multiple operating systems using a USB hard drive connected to the Raspberry Pi. It comes as no surprise as the BerryBoot OS is very popular amongst makers, easily allowing fast changing your OS for quick prototyping. Users can run multiple projects using just one Raspberry Pi and single storage device.
When the Raspberry Pi foundation released the Raspberry Pi 3 board they also issued a number of statements indicating what features and tools they will develop for the future. The first of these promises is the USB mass storage boot mode, as well as the boot over Ethernet. Whilst these new boot modes are still in Beta, you can still test out most of the features.
How does this work?
From what I have read on the Raspberry Pi forums and their user guide is that inside Broadcom’s SoC, there is a small boot ROM, which is a small piece of code used to boot the device. This boot ROM is programming by default to read the files from the SD card and execute them. The process from when you switch on the Raspberry Pi is that it looks for a file on the SD card called bootcode.bin; when it finds this file it loads into the system memory and then loads up the rest of the OS such as firmware and the system ARM Kernel.
By default, the Raspberry Pi already comes with two boot modes; SD boot and USB boot mode. The USB boot mode is not enabled and as such it requires a little bit of tinkering before using the USB boot, including initially booting from an SD card to make the system changes and then copying the OS to a USB mass storage on the Pi.
Requirements
You will need the following hardware to boot the Raspberry Pi from a USB mass storage device:
*Please note that the process of booting from the USB mass storage is still under development and as such some USB storage devices may not be compatible or may not function as efficiently as others.
The following guide is based on the Raspberry Pi foundation official guide and also my own personal experience, creating a bootable USB drive. For further information, you can visit the Raspberrypi.org website.
Programming USB boot mode
Before booting the Raspberry Pi using a USB mass storage device you will need to download the latest Raspbian operating system from www.raspberrypi.org/downloads and install onto a MicroSD card. If you are using Windows operating system, you can format the SD card using the SD formatter tool and then upload the image to the SD card using the WinDisk32 Image tool.
If you are using MAC OS, then the best tool that I use is the “ApplePi-Baker”, which not only uploads the Raspbian image to the SD card but also formats it first.

Now that you have your SD card formatted, you will need to insert it into the Raspberry Pi 3 and power up the board. Once booted, connect your Raspberry Pi to your internet connection by using WiFi or the Ethernet cable. To setup WiFi on the Raspberry Pi you can use the following guide from maker.io.
Before we do anything, it is always important to update the OS to the latest software. Open up a terminal window and type the following to update:
sudo apt-get update
Once done, you will need to use a built-in tool called rpi-update to install the special files required to boot from USB, such as the start.elf and bootcode.bin as mentioned before. Run the following from the command line:
sudo BRANCH=next rpi-update
Then enable USB boot mode with:
echo program_usb_boot_mode=1 | sudo tee -a /boot/config.txt
The above adds the boot mode 1 to the config.txt file so when the Raspberry Pi is booted, it also looks for a USB boot device. You can now reboot the Raspberry Pi with:
sudo reboot
According to the Raspberry Pi guide, you can confirm the changes by typing the following command:
vcgencmd otp_dump | grep 17:
You should receive the following output; however, I didn’t receive the correct output as stated (0x3020000a) but I decided to continue rather than investigate and as it turned out it made no difference to the outcome.
Preparing the USB storage device
Now that the Raspberry Pi 3 has been USB boot-enabled you can now go ahead and prepare the USB mass storage device. This process does take quite a bit of time (approximately 45 minutes!) when I ran the commands and transferred the OS from the SD card to the USB device.
First you need to create a partition on the USB device to create a 100MB fat32 (windows) partition and a Linux ext4 partition that will take up the rest of the space. Type in the following commands in the terminal to partition the USB device:
sudo parted /dev/sda
(parted) mktable msdos
Warning: The existing disk label on /dev/sda will be destroyed and all data on this disk will be lost. Do you want to continue?
Yes/No? Yes
(parted) mkpart primary fat32 0% 100M
(parted) mkpart primary ext4 100M 100%
(parted) print
Model: SanDisk Ultra (scsi)
Disk /dev/sda: 30.8GB
Sector size (logical/physical): 512B/512B
Partition Table: msdos
Disk Flags:


Number  Start   End     Size    Type     File system  Flags
 1      1049kB  99.6MB  98.6MB  primary  fat32        lba
 2      99.6MB  30.8GB  30.7GB  primary  ext4         lba
You may be prompted along the way if you wish to reboot the device or receive some errors as I did. I simply ignored the warnings and continued, which worked out fine. You can check everything went ok by typing the following:
parted print
I proceeded onto the next steps in the Raspberry Pi guide, however I encountered a number of issues. I would advise to do a system reboot at this point by typing the following:
sudo reboot
Create the boot and root filesystems:
sudo mkfs.vfat -n BOOT -F 32 /dev/sda1
sudo mkfs.ext4 /dev/sda2
Mount the target filesystems and copy the running raspbian system to it:
sudo mkdir /mnt/target
sudo mount /dev/sda2 /mnt/target/
sudo mkdir /mnt/target/boot
sudo mount /dev/sda1 /mnt/target/boot/
sudo apt-get update; sudo apt-get install rsync
Running the following command to copy the file system takes approximately 30-45 minutes:
sudo rsync -ax --progress / /boot /mnt/target
Regenerate ssh host keys:
cd /mnt/target
sudo mount --bind /dev dev
sudo mount --bind /sys sys
sudo mount --bind /proc proc
sudo chroot /mnt/target
rm /etc/ssh/ssh_host*
dpkg-reconfigure openssh-server
exit
sudo umount dev
sudo umount sys
sudo umount proc
Now that everything has been copied over to the USB storage device you need to edit the /boot/cmdline.txt file so that it uses the USB file system rather than the SD card file system:
sudo sed -i "s,root=/dev/mmcblk0p2,root=/dev/sda2," /mnt/target/boot/cmdline.txt
The same needs to be done for fstab
sudo sed -i "s,/dev/mmcblk0p,/dev/sda," /mnt/target/etc/fstab
Finally, unmount the target filesystems, and power off the Pi.
cd ~
sudo umount /mnt/target/boot
sudo umount /mnt/target
sudo poweroff
Now that everything has been setup you can unplug the power supply to the Raspberry Pi and remove the SD card inserted. Plug the power back in and the Raspberry Pi should boot up. You will need to be a little patient at first as booting the Raspberry Pi from USB is a little slower than usual.

Issues
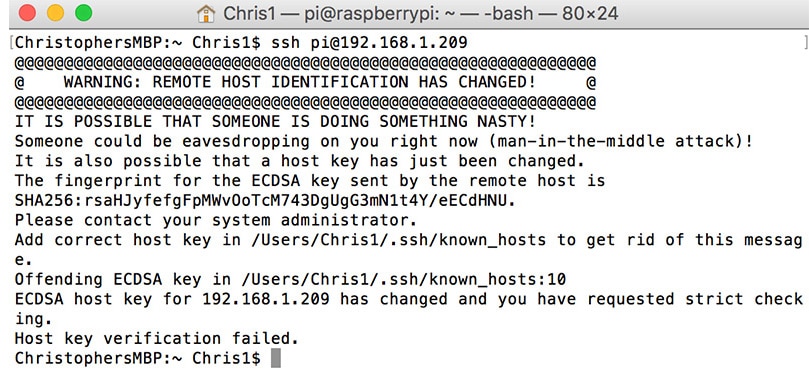
Despite following the commands to create new SSH keys, I still encountered the following issue when trying to access the Raspberry Pi via SSH.

Summary
I think the idea of booting from mass storage will really appeal to some users however it is a lot of work just to get it to work and I would much prefer an out of the box solution from the Raspberry Pi foundation. I can see it being used in schools really well, allowing students to keep all their file system and projects on a USB device to carry round between classes.