Arduino.org Ciao Library – Connecting your Sketches to the Internet of Things
2016-08-17 | By Maker.io Staff
Arduino Ciao is an easy-to-use and quite powerful library that enables your standalone sketches to communicate intuitively with the outside world. It was specifically designed to simplify the interaction between the Microcontroller and Arduino OS allowing a number of different connections using the most common IoT protocols or third-party services.
Also, Arduino Ciao is open-source and distributed under the MIT license which allows developers to read it, suggest feedback, and also develop new features for specific application or projects.
Ciao has been designed and developed to be modular and easily configurable. It’s main goal was to support several Connectors capable of interacting with system resources such as the filesystem or console. It allows communication with the most common and useful protocols; MQTT, XMPP, HTTP, SMTP and many more. It can also interact with third party applications such as Twitter, Facebook etc.
Arduino Ciao Architecture
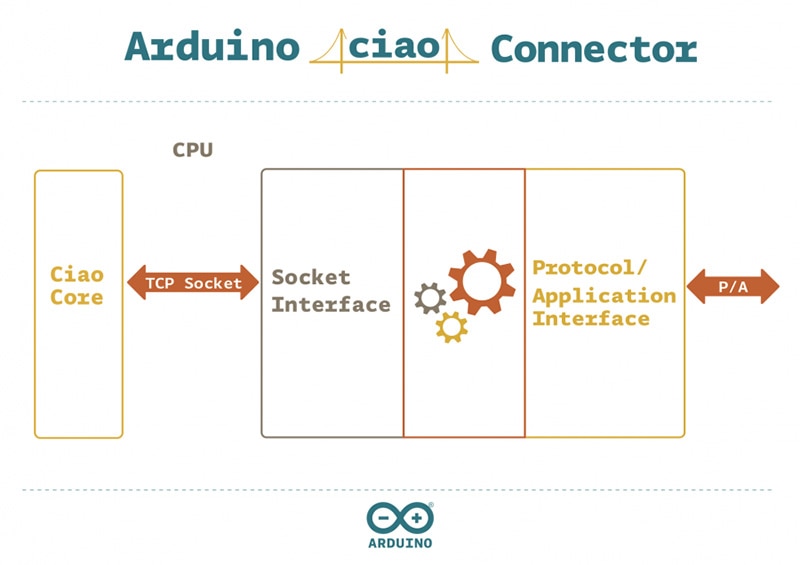
To communicate with the outside world, the Ciao library interacts with the Ciao Core, which is the key component of the Ciao technology on the Microprocessor side. Ciao Core has a core multi-threaded module developed to interact with the MCU and acts like a simple router of information with enabled connectors.
Connectors are the tools of Ciao that connect to the world. There are main connectors like RestServer, Shell and MQTT that are pre-installed with Ciao, other connectors and third-party connectors are available through the Connectors Repository and can be installed via opkg. These Connectors communicate with Ciao Core using JSON strings sent over TCP sockets.

The Ciao Library is constantly being developed on but there is already a comprehensive list of connectors available already.
Internal Connector:
- Rest
- Rest Server
- File System
- Shell
- MQTT
External Connector:
- Phant.io
- SMTP
- XMPP
- WebSocket
Installing Ciao Library
There are a number of different ways in which you can install the Ciao library, however you will need the following requirements in order to run Ciao Library:
- Ciao: it can be installed via the package manager or from source
- Ciao Library: it is available in the latest Arduino IDE since version 1.7.7, you can also add it manually by importing the library
- Ciao compatible board: Arduino Yun, Arduino Yun Mini, Linino One, Arduino Tian, Arduino Industrial 101
- An internet connection to your board: via WiFi or Ethernet
Via Package Manager
Login to your board using SSH and at the shell prompt type in the following for Arduino OS:
$ opkg update
$ opkg upgrade arduinoos python python-mini
$ opkg install ciao
$ reboot
If you have the Arduino Tian board then type the following:
$ opkg update
$ rm /etc/udev/udev.conf
$ opkg upgrade arduinoos udev python-base python-light
$ opkg install ciao
$ reboot
Via Arduino OS
If you have the Arduino OS installed on your device, then you can use the built-in Arduino Package Manager to install Ciao. Access the Arduino OS by opening up your browser and going to following URL , http://arduino.local/ . Enter your password and login to the Arduino OS.

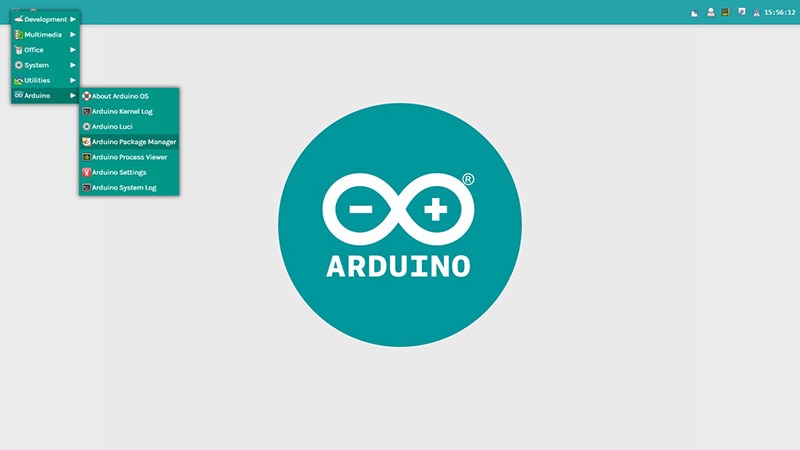
From the Arduino OS menu open the Arduino Package Manager, which can be found by navigating to Applications>Arduino, as shown below.

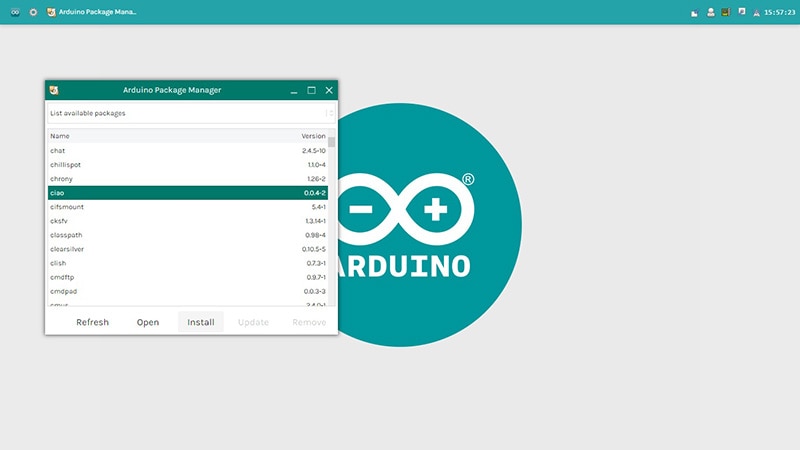
Click on Arduino Package Manager Panel and then select the Ciao package and press the install button to start the Ciao installation.

The Ciao library will now start to begin to install on your device.
Install Ciao Library
You can import the Ciao library into the Arduino IDE by downloading it from their GitHub repo and unzipping it.
Inside the Arduino IDE go to, Sketch>Import Library>Add Library and then select the folder where you unzipped the Ciao Library to.
The library will now be available or use by selecting Sketch>Import Library in the menu.
Using the Ciao Library
Ciao Library allows you to send and receive data outside the microcontroller, through a serial communication, in a simple and intuitive way. Ciao Library provides three main functions that can be used in your sketch:
- read(connector)
- write(connector, param1, param2, param3)
- writeResponse(connector, id, param1, param2, param3)
In addition to those functions, comes in handy CiaoData, which provides utilities functions for manage, extract and manipulate information data.
- get(index)
- isError()
- isEmpty()
In order to use Ciao Library you only need to:
- import Ciao Library
- initialize it with the begin() function
read
The read function enables the board to receive data from a connector (examples: xmpp, websocket, twitter). It returns a CiaoData object composed by the id and the data provided by the connector.
The get function will allow you to retrieve the various field from the CiaoData object (look get Function).
Example
To retrieve data from a XMPP connector, you need to do these simple steps:
#include <ciao.h>

setup{
    Ciao.begin()
}
loop{
    CiaoData data;
    data = Ciao.read("xmpp");            // query to xmpp connector
}
</ciao.h>
write
The write function enables the board to send data to a connector. It accepts up to 4 parameters, the first is always the connector type we want to interact with, while the other parameters may be used freely according to different use cases that can occur.
Example:
Supposing to send data to a XMPP connector, the parameters in the write function will be:
- first parameter is connector type
- second parameter is destination name
- third parameter is the message to send
#include <ciao.h>

setup{
    Ciao.begin();
}
loop{
    Ciao.write("xmpp","user@xmpp","hello from MCU");
}
</ciao.h>
writeResponse
The writeResponse function enables to directly reply to a request sent by a connector. It accepts up to 5 parameters, the first is always the connector type we want to interact with, the second is always the id value we want to send the response, while the other parameters may be used freely according to different use cases that can occur.
Example:
Supposing to response to a previous XMPP request, the parameters in the writeResponse function will be:
- first parameter is connector type
- second parameter is id of the XMPP request
- third parameter is the message to send
#include <ciao.h>

setup{
    Ciao.begin();
}
loop{

    CiaoData data;
    data = Ciao.read("xmpp");            // query to xmpp connector
    String id = data.get(0);
    String sender = data.get(1);
    String message = data.get(2);
    Ciao.writeResponse("xmpp",id,"response from MCU");

}
</ciao.h>
get
The get function allows to extract information contained inside CiaoData. This information can be varying according to the connector type used.
The function accepts only one parameter that is the position (index) of the data format set in the connector.
Example
CiaoData for an XMPP connector is usually composed by an id (index "0"), a sender (index "1") and the message (index "2").
To extract this information, you can follow the below steps:
#include <ciao.h>

setup{
    Ciao.begin()
}
loop{
    CiaoData data;
    data = Ciao.read("xmpp");            // query to xmpp connector

    String id = data.get(0);                 // get information from CiaoData
    String sender = data.get(1);
    String message = data.get(2);
}
</ciao.h>
splitString
The splitString function enables the user to manage the MCU command sent by the connector.
The function accepts up four parameters, the first is the serial command for the MCU, the second parameter is the character that should be used to split the serial command, while the third and fourth parameter are respectively, the array of strings used to split the serial command received and the size of the array itself.
Example
If by a XMPP connector, send a command with three parameters, like "digital/13/1". To split the command will need to create a three element string array, and after, invoke the splitString function, as below:
#include <ciao.h>

void setup() {
     Ciao.begin();
     Serial.begin(57600);
}

void loop() {
     CiaoData data = Ciao.read("xmpp");
     String id = data.get(0);
     String sender = data.get(1);
     String message = data.get(2);
     String command[3];
     splitString(message,"/",command,3);
     Serial.println("command type: "+command[0])   //output is digital
     Serial.println("pin: "+command[1])                      //output is 13
     Serial.println("pin value: "+command[2]))            //output is 1
}
</ciao.h>
isError
The isError function enables the user to check if the CiaoData object contain an error code.
The function returns the true boolean state if in the CiaoData is present an error code.
Examples
Check if in the data received from the XMPP connectors is present an error code.
#include <ciao.h>

void setup() {
Ciao.begin();
Serial.begin(57600);
}

void loop() {
CiaoData data = Ciao.read("xmpp");
    if(data.isError()){
      String message = data.get(2);
      Serial.println(" error:"+ message);
    }
}
isEmpty
</ciao.h>
The isEmpty function enables the user to check if the CiaoData object is empty.
The function returns the true boolean state if the CiaoData is empty.
Examples
Extract the information contained in CiaoData object only if the object is not empty.
#include <ciao.h>

void setup() {
Ciao.begin();
    Serial.begin(57600);
}

void loop() {
CiaoData data = Ciao.read("xmpp");
  if(!data.isEmpty()){
        String id = data.get(0);
      String sender = data.get(1);
      String message = data.get(2);
      Serial.println("id: "+id);
      Serial.println("sender: "+sender);
      Serial.println("message: "+message);
    }
}
</ciao.h>

Have questions or comments? Continue the conversation on TechForum, DigiKey's online community and technical resource.
Visit TechForum


 中国
中国