制造商零件编号 PIM546
PICO UNICORN PACK
Pimoroni Ltd
License: See Original Project
Courtesy of Pimoroni
Guide by Pimoroni
What a time, eh? After an absolute whirlwind of a launch, Raspberry Pi Picos is starting to land through people's letterboxes and a lot of folks who've not had much to do with microcontrollers before are looking for a place to start figuring out what to do with them. Welcome! Now is the perfect time to get onboard the microcontroller train - you're going to love it.
What is this guide?
In this guide, we're going to give a brief, beginner friendly primer on the Pico and show you the steps necessary to get it set up and ready for programming with MicroPython. We'll also cover what you need to do to be able to play with various Pimoroni add-on boards. We'll have more specific content for individual boards in the future, but hopefully this guide will be just enough to get you started experimenting with your Pico.
We're not going to go into huge detail about everything the Pico can do here - for a comprehensive, beginner friendly guide with lots of fun experiments to do with physical hardware we'd recommend the excellent Getting Started with MicroPython on the Raspberry Pi Pico book. If you're after technical detail we'd suggest checking out the resources on the Raspberry Pi site, including the extensive Pico datasheet. If you know how to program a microcontroller already you can find function references for our boards and suchlike in our Pico GitHub repo.
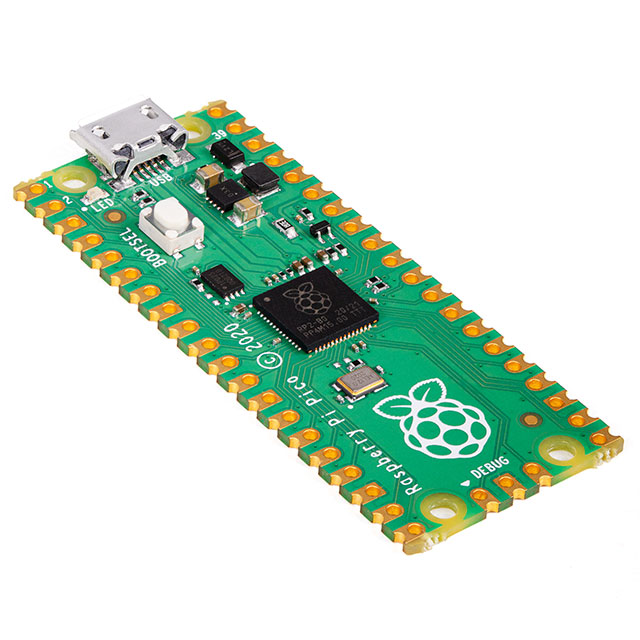
About Raspberry Pi Pico
Raspberry Pi Pico is Raspberry Pi's first microcontroller board, designed around their very own microcontroller chip - the RP2040. A Pico is not a replacement or upgrade for a Raspberry Pi - they're very different beasts! A Raspberry Pi is a Single Board Computer that runs Linux, to which you can connect a monitor, keyboard and mouse and interact with via a terminal prompt or a graphical user interface such as the Raspberry Pi OS desktop. You can run many different Linux applications on a Raspberry Pi, and it has a ton of processing power and RAM.
While Raspberry Pi’s are champion multi-taskers, microcontrollers shine in projects where they have one job and need to do it well. Because they're programmed from another computer and don't need to run a full OS, they have greatly reduced power consumption compared to SBCs and are ideal for powering from batteries. Programs on microcontrollers just start running once they're powered up, so there's no boot up time, and you usually don't need to shut them down safely. Focusing on just one thing means that microcontrollers are typically more stable and predictable, making them perfect for using as the brains of projects that need to Just Work, like industrial machines, coffee makers or emergency zombie defence turrets.
Interfacing with hardware is also more straightforward with microcontrollers, and Raspberry Pi Pico is specifically geared towards physical computing (AKA connecting it to interesting stuff that lights up, moves, or makes noise). Unlike a Pi, Pico has inbuilt Analog to Digital Convertors (ADCs) so you can connect it to a wider range of sensors and inputs. It also has Programmable IOs (PIOs) which are used behind the scenes in our libraries, outsourcing simple bits of programs to run in the background and freeing up the majority of the Pico's CPU to concentrate on the trickier parts. If you're interested in the possibilities of PIOs check out our Unicorn Pack page, where we describe how we managed to get 14 bits of resolution from the LED drivers on the Pico version (meaning improved rainbows!)
As of July 2022, you can also get a Pico W (aka Picow 🐄) which has wireless connectivity - exciting!
What you'll need
MicroPython or C/C++?
You can program Pico with MicroPython (a version of Python especially for microcontrollers) or the C/C++ SDK (you might be familiar with C/C++ if you've had anything to do with Arduinos) - we have code examples and libraries for both! It's also possible to use CircuitPython (Adafruit's version of MicroPython) on the Pico but Pimoroni boards may not currently be easily compatible if you go down this route.
This guide is going to use MicroPython as it's super simple to get going with our custom firmware, and you can use Thonny to program your Pico from a PC, Mac or even a Raspberry Pi.
Installing the custom firmware
To be able to use our Pico addons (or Breakout Garden breakouts) you'll need to download our custom build of MicroPython which comes with all the drivers baked in. You can find pre-built MicroPython images for Raspberry Pi Pico, Pico W and our other RP2040 boards on the releases page of our pimoroni-pico Github repository - scroll down to the assets section of the most recent release for a list of .uf2 files. For a Raspberry Pi Pico, you'll need to download the Pico-flavoured .uf2:
If you have a Pico W, be sure to download the Pico W specific image which has all the wireless stuff built in.
To copy this file to your Pico, you'll need to put it into bootloader mode. To do this, hold down the BOOTSEL button whilst plugging the USB cable into your computer - it should now show up as a drive called RPI-RP2. Here's what it looks like in Windows:
Copy the downloaded .uf2 file across to this new drive. Your Pico will now reboot, and after a few seconds it will be running pirate-brand MicroPython (you probably won't notice any difference, but it's actually singing sea shanties very quietly to itself.)
Once you've done this your Pico won't show up as a drive anymore when you plug it in, you'll need to use an interpreter to talk to it. We're using Thonny!
Installing Thonny
Thonny is a Python IDE (an Integrated Development Environment). It's the software you'll install on your computer to program your Pico.
If you're programming your Pico from a Raspberry Pi running the desktop version of Raspberry Pi OS, Thonny should be installed already. You may need to update it to the most recent version to get the Pico specific options, you can do this by opening up a terminal (find it in the menus or hit Ctrl-Alt-T) and typing.
sudo apt update && sudo apt upgrade -y
and pressing enter.
You can download Thonny in Windows, Mac, or Linux flavours here. Once it's installed, open it up!
You'll need have 'MicroPython (Raspberry Pi Pico)' selected as your Python interpreter - you can do that by clicking on the box at the bottom right. Thonny might offer to install MicroPython for you, you don't need to do this as you should already have our variant of MicroPython installed.
If you don't see a MicroPython prompt with three arrows like the one above, try clicking the red stop button to interrupt any processes that are running.
COULDN'T FIND DEVICE AUTOMATICALLY?
If Thonny has problems automatically detecting your board, you can select your board manually by clicking on 'MicroPython (Raspberry Pi Pico)' at the bottom right and clicking on 'Configure Interpreter'. You can then select the correct board under 'Port' - our Pico showed up as COM46.
Using Thonny (Hello World and Blink)
With your Pico connected to your computer with the USB cable (no need to hold down the button this time, you don't want to be in bootloader mode), click on the bottom 'Shell' box, so you get a flashing cursor. By typing instructions into this box, you can give commands to your Pico directly, one command at a time (this is called REPL or Read-Eval-Print Loop.)
Try typing
print("hello world")
and pressing enter. See how it parrots hello world right back at you? Your Pico is talking back to you via the serial console, and it can tell you all sorts of useful things - error messages and anything you print (such as sensor readings) will show up in this box. This can be very handy for debugging your code!
Of course, you will probably want to queue up more than one line of instructions to make up a program- that's what the top box is for. Here's a basic program you can try to test out your Pico is working properly, before soldering anything to it. You can either copy and paste it into Thonny or type it in. If you're typing it in, make sure the bottom two lines have four spaces in front of them to indent them (indents are used in Python to denote when code is part of a loop.)
import machine
import time

led = machine.Pin('LED', machine.Pin.OUT)

while True:
    led.toggle()
    time.sleep(2)
This program
Once you're ready to transfer the program to your Pico, press the green 'run current script' button in the top toolbar. You may be prompted to give it a name - you can use any name you like, but if you save the file to your Pico as main.py it will run automatically when the Pico is connected to power, you won't need to start it in Thonny. This is useful if you want to make a battery powered project that won't be connected to a PC!
Note that when using MicroPython you won't be able to copy code that you've written to your Pico by holding the button down to put it into bootloader mode and copying the file across - you'll always need to transfer it using Thonny.
Soldering the headers
To plug in our addon boards or to plug your Pico into a breadboard, your Pico will need to have headers soldered to it, with the pins sticking out of the back. Soldering headers is not hard with modern PCBs and we'd encourage you to give it a go (but if you'd rather skip the soldering, we should have pre-soldered Picos available very shortly.)
Your headers might come pre-separated into two 20 pin lengths, or in one long length. If it's the latter, you can separate them in to two lengths with side cutters (it's also possible to break them apart with sturdy scissors, or even your thumbnail.)
You'll need to solder your headers so that the pins are sticking out of the back of the Pico, with the long pins sticking out of the side with the labels and the soldering itself on the side with the button. The pins should be at right angles to the Pico so that they can plug into things nicely. Using a breadboard to hold the pins in place while you solder is a good way of making sure things remain square while soldering, but you can also use a large blob of blu-tack or similar to hold things together (or even a helping hand, if you're fancy.)
Poke the long ends of your two lengths of header into your breadboard, the same width apart as the two rows of holes on your Pico.
Place your Pico on top of the short ends with the button and the raspberry facing upwards.
Make sure your workspace has adequate ventilation and consider wearing eye protection as solder can sometimes behave unexpectedly. Once you're ready to start soldering, make sure to tin the end of your iron - wait until it's up to temperature, melt a little bit of solder onto the tip and then clean off the excess using your tip cleaner. You're ready to go!
You'll want to position your soldering iron so it's applying heat evenly to the header pin and the pad on the board, and then hold it in place for a few seconds. You can then feed a little bit of solder into the place where the pad, the iron and the header pin meet - don't go overboard with the solder, you only need a tiny bit, and you can always add more later. The solder should flow satisfyingly down the iron and form a joint between the pad and the pin.
We'd suggest soldering one pin at each end, and then checking again to make sure the headers are square. You can adjust them at this point if you need to, but you won't be able to later. Once you're satisfied that everything is 90°, go ahead and solder the rest of the pins.
When you're done, check your solder joints from all angles. A good joint should surround the pin on all sides, and ideally should be shaped like a squat little cone. If you have joints that don't quite surround the pin, heat up the solder again to reflow it, and hopefully it will fill the gaps. If it doesn't, you can add a bit more solder (but try reflowing the solder on its own first). You'll also want to check for solder joints that touch and bridge two pins - if you have any of these you can fix them by holding your iron to the middle of the unwanted join for a second or two, which should make the two blobs separate.
When removing your Pico from the breadboard we'd suggest holding on to the long edges and rocking it gently from side to side whilst pulling upwards slowly - try to avoid putting too much pressure on the pins at the ends as these are most liable to bend. If they do get bent you can bend them back, but doing this too many times can cause metal fatigue.
Using Pimoroni Bases and Packs
Once your Pico has headers attached, it's fully equipped for plugging into one of our Packs or Bases. All our Pico addons have markings that should make it obvious which way round you need to plug it in - here is a upside down Display Pack, ready for plugging in to a Pico (the surfaces shown in the photo below will be on the inside of the Pico+Pack sandwich.)
Double check you've got the male and female headers lined up and push on the edges of the board to join them together (if you're using a Display Pack, take care not to apply pressure to the screen.)
Pico landing areas on Bases are similarly marked, just match up the markings on the PCB to figure out which way round the Pico should go.
Removing Pimoroni Bases and Packs
If you need to remove your Pico from a base or pack, hold on to the long edges of the boards and wiggle them gently from side to side whilst slowly pulling the boards away from each other. The headers can grip on quite securely so it's best to hold onto the edges of the PCBs while you're separating them, don't pull on the Pico's USB port or any of the components on your Pack or Base.
Running our examples
Once everything's assembled, we'd suggest checking out our example code - you can find the MicroPython examples here. Once you've found the .py file for the demo you want to try, you can copy and paste it into Thonny and run it in the same way as you ran the blink example (if you click on the 'Raw' button it will strip out all the GitHub formatting, making it easier to copy and paste.)
Troubleshooting
My Pico doesn't show up as a drive when I connect it to my computer!
Unlike some other microcontroller boards, you'll need to hold down the BOOTSEL button whilst plugging it in to your computer for it to show up as a drive. If you're doing that and it's still not showing up, you might be using a power only USB cable - try a different one!
I get an ImportError in Thonny when I try and flash my code!
If you get an error that looks something like ImportError: no module named 'picographics' then you probably have the vanilla Raspberry Pi MicroPython .uf2 installed instead of the Pimoroni one. Scroll back up to the 'Installing the Custom Firmware' section for instructions on how to download and install the correct firmware.
I get a 'Device is busy' error in Thonny when I try and flash my code!
If you get this error when you press the 'run current script' button to send code to your Pico, press the red 'stop/restart backend' button first to stop it from doing whatever it's doing.
How do I factory reset/delete files from my Pico?
If you need to delete all your programs from your Pico's flash memory and start again from scratch, you can do that by downloading this special .uf2 file and copying it to your Pico whilst it's in bootloader mode. We found this useful when we had a malfunctioning main.py which was locking up the Pico to the extent that it could longer communicate with Thonny. You'll need to copy the MicroPython image across again afterwards.
That's all folks!