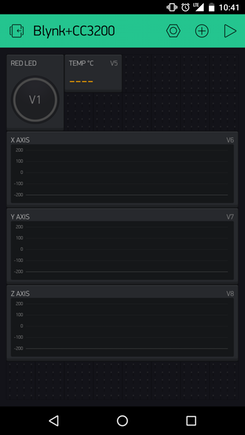
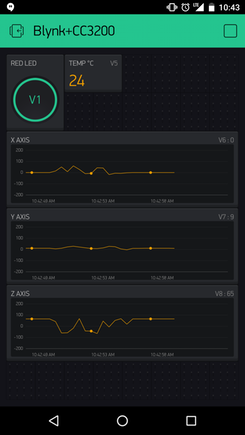
The Red LED is assigned to Virtual Pin 1, and the temp sensor is assigned to virtual pin 5. The app will send button press information to the launchpad and request temperature readings once per second.
The X, Y, and Z axes of the accelerometer are assigned to virtual pins 7, 8 and 9. The app will request their values from the LaunchPad every 250ms.
Each of the widgets is assigned a virtual pin. We will use these virtual pins in the embedded code to communicate with the app. You will see in the code below where we define the button (V1) to control the Red LED on the LaunchPad, V5 to read the temperature sensor, and V6-V8 to read the accelerometer data.
I arranged the widgets in my app like this:

The Embedded Code
If you haven't, install Energia. You can find download links and some more information about Energia here: www.energia.nu
Now, download the Blynk libraries here: https://github.com/blynkkk/blynk-library/releases
Extract the .zip file and copy the folder "Blynk" and "SimpleTimer" to \energia-0101E0017\hardware\cc3200\libraries\ (this may vary depending on where you installed Energia.)
Launch Energia and create a new project. Copy the code below, add in your authorization token (from the Blynk app) and your WiFi credentials. Make sure you have CC3200LP selected in Tools > Board and the correct port selected in Tools > Serial Port.
Press the "play" button in the Blynk app to deploy your app.
In the serial terminal, you should see the LaunchPad connect to your WiFi network and display the temperature each time the app requests data from the board.
Demo

The Code
Make sure you update with your Auth Token and WiFi credentials.
Copy Code
/**************************************************************
 * Blynk is a platform with iOS and Android apps to control
 * Arduino, Raspberry Pi and the likes over the Internet.
 * You can easily build graphic interfaces for all your
 * projects by simply dragging and dropping widgets.
 *
 *   Downloads, docs, tutorials: http://www.blynk.cc
 *   Blynk community:            http://community.blynk.cc
 *   Social networks:            http://www.fb.com/blynkapp
 *                               http://twitter.com/blynk_app
 *
 * Blynk library is licensed under MIT license
 * This example code is in public domain.
 *
 **************************************************************
 * This example shows how to use TI CC3200-LaunchXL
 * to connect your project to Blynk.
 *
 * Feel free to apply it to any other example. It's simple!
 *
 **************************************************************/

#define BLYNK_PRINT Serial    // Comment this out to disable prints and save space
#include <SPI.h>
#include <WiFi.h>
#include <BlynkSimpleTI_CC3200_LaunchXL.h>
#include <Wire.h>
#include "Adafruit_TMP006.h"
#include <BMA222.h>

// Sensor objects
BMA222 mySensor;
Adafruit_TMP006 tmp006(0x41);

// You should get Auth Token in the Blynk App.
// Go to the Project Settings (nut icon).
char auth[] = "XXXXXXXXXXXXXXXXXXXXXXXXXX";

// Your WiFi credentials
char ssid[] = "YOUR SSID HERE";
char pass[] = "YOUR WIFI PASSWORD HERE";        // Set to "" for open networks
int dataX = 0;
int dataY = 0;
int dataZ = 0;

void setup()
{
  //Open a serial terminal with the PC
  Serial.begin(9600);
  //Set up a blynk connection with your WiFi credentials
  Blynk.begin(auth, ssid, pass);

  //Accel. setup
  mySensor.begin();

  //TMP006 setup
  tmp006.begin();

  //Setup RED LED to be an output
  pinMode(RED_LED, OUTPUT);
  digitalWrite(RED_LED, LOW);
}

// Virtual Pin 1 - Toggles the LED high or low depending on the mobile app input
BLYNK_WRITE(V1)
{
  //Print to the terminal
  BLYNK_LOG("Got a value: %s", param.asStr());

  //save teh value fromt he app to the variable i
  //if i=1, turn the LED on
  //if i=0, turn the LED off
  int i = param.asInt();
  if(i == 1)
  {
    digitalWrite(RED_LED, HIGH);
  }
  else if(i == 0)
  {
    digitalWrite(RED_LED, LOW);
  }
}

//Virtual pin 5 - Read the TMP006 value when called by the app
BLYNK_READ(5)
{
  float objt = tmp006.readObjTempC();
  Serial.print("Object Temperature: ");
  Serial.print(objt);
  Serial.println("*C");
  Blynk.virtualWrite(V5, (int)objt);
}

// Virtual Pin 6
// When virtual pin 6 is requested by the mobile app, we
// will also send data for pins 7 and 8 so all 3 graphs
// are updated
BLYNK_READ(6)
{
  //Send X axis data
  dataX = mySensor.readXData();
  Blynk.virtualWrite(V6,dataX);
  //Send Y axis data
  dataY = mySensor.readYData();
  Blynk.virtualWrite(V7,dataY);
  //Send Z axis data
  dataZ = mySensor.readZData();
  Blynk.virtualWrite(V8,dataZ);
}

// The main loop listens for commands from the mobile app
void loop()
{
  Blynk.run();
}


 中国
中国