How To Get Started with Jupyter
2023-10-16 | By Maker.io Staff
This article explains what Jupyter is, summarizes the necessary steps for installing Jupyter Lab, and illustrates how you can get Jupyter up and running in no time, even if you’ve never used the unique IDE before.

What is Jupyter?
Jupyter is an open-source integrated programming environment (IDE) commonly used for solving machine learning and data science tasks. The editor's unique use of cells allows you to write source code and integrate calculation results, comments, graphs, images, lab notes, and more into a single document. The IDE's cells effectively allow building an interactive notebook for documenting your progress, which also makes it easier for beginners to get into programming with various languages, such as Python and R. Furthermore, Jupyter can be a valuable tool in classroom and lab environments, as it lets instructors distribute pre-populated notebooks with instructions that students can read through and fill in to solve assignments.
Installing Jupyter Lab Using Pip
Multiple methods exist for installing Jupyter on Windows, macOS, and Linux. However, utilizing the Python Package Index is the most commonly used method that works similarly across all three platforms. Alternatively, you could choose to install Anaconda, a custom version of Python, and then use its package manager — conda — to download and install Jupyter.
Start with downloading and installing the most recent version of Python and pip from the official website. Windows users may also choose to install the Windows Store version. Linux users can employ their favorite package manager, for example, apt:
sudo apt install python3 python3-pip
Regardless of the method, use a terminal window to verify that the installation succeeded by starting the Python interactive shell:
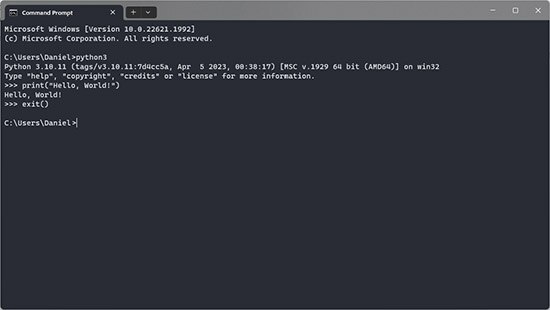 Start the interactive Python console by typing python in your operating system’s terminal to verify that the installation was successful.
Once done, use the following command to instruct pip to download and install Jupyter:
pip install jupyterlab
Note that the installation could take a while, but once it finishes, use the following command to start Jupyter:
jupyter lab
Note that on some versions of Windows, the installation process may fail due to missing long-path support. However, you can enable long paths by running the following command in Powershell as an administrator:
New-ItemProperty -Path
"HKLM:\SYSTEM\CurrentControlSet\Control\FileSystem" -Name
"LongPathsEnabled" -Value 1 -PropertyType DWORD -Force
If you encounter a long-path error, restart the installation using the previous pip command after setting the system variable using Powershell.
Opening Jupyter Lab
Jupyter Lab is not a classic desktop application. Instead, executing the start command from above in a terminal window loads a server hosting a website on your local computer that you can access using any web browser on the same computer. Starting Jupyter should automatically open the default browser and load the user interface. However, you can also copy and paste the URL displayed after startup if the browser doesn’t open:
 Copy the link from the terminal window to navigate to Jupyter Lab.
Then, in the browser, start a new Python Notebook by clicking the following button:
 Create a new notebook by clicking the highlighted button in Jupyter Lab.
Creating a Python Notebook in Jupyter
The newly created notebook already contains a single empty cell by default. You can enter any Python code in that cell, but for now, start with some simple variable definitions, calculations, and print method calls:
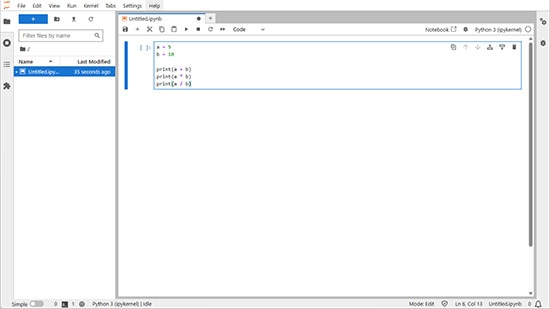 Type a few Python commands into the default cell.
Then, press Shift + Enter with the cell selected to evaluate and run the source code in that cell. Jupyter then inserts the results beneath the executed cell and auto-inserts a new cell underneath the evaluation result:
 Evaluate the entered code by pressing Shift + Enter.
Add a few more cells with simple calculations so your notebook contains some cells. Note that you can always reference variables created in other ones, given that Jupyter already evaluated the cells containing the variable definitions.
To delete a cell, simply hover your mouse over it until a small trash can icon appears, then click on it.
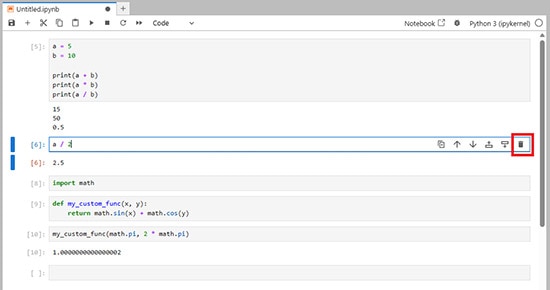 Use the highlighted button to delete a cell. You can also double-tap the d-key to delete it.
Next to the delete button are five more useful functions for managing cells. The first one in the row inserts a copy of the currently selected entry. The next two buttons move cells up and down, and the final two buttons insert a new cell above or below the currently selected one:
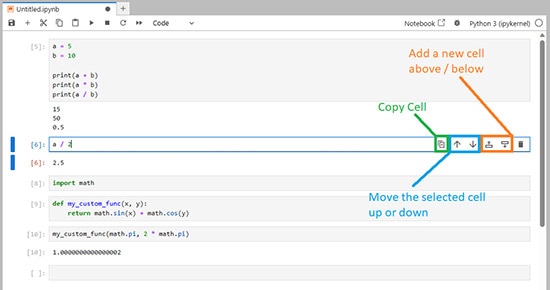 Use the highlighted buttons to move cells around and create new ones.
Finally, use the following button to evaluate all code cells in the notebook from top to bottom, which can be useful when the cells have dependencies, such as function or variable declarations:
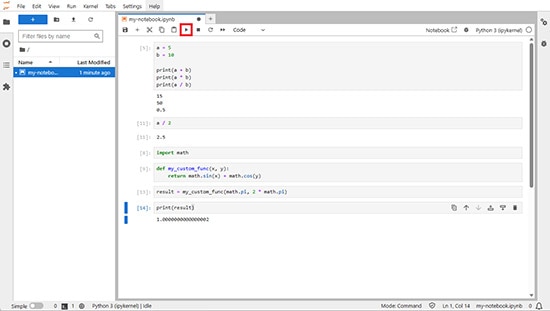 Run all code cells in the notebook by clicking the marked button.
Adding Documentation to Jupyter Notebooks
As code cells act like standard Python editor frames, you could document the entire notebook using Python code comments. However, one of the main benefits of using Jupyter is that it allows splitting Python programs into smaller, more manageable chunks and adding descriptions and images between the cells to explain what’s going on.
To include descriptions in a Jupyter Notebook, add a new cell and change its type from code to markdown using the following dropdown menu:
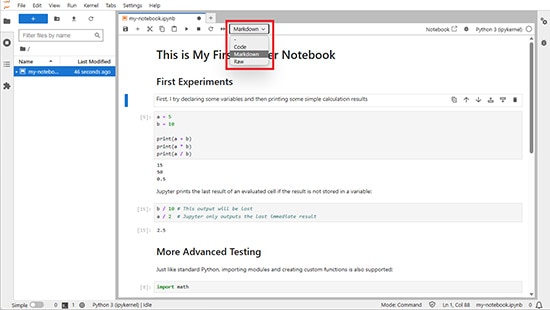 Change the cell type using the highlighted dropdown menu.
Then, type your comment in the updated cell and press Shift + Enter when done. Jupyter’s text cells support markdown formatting, which allows adding headings, hyperlinks, images, text styles, tables, and much more. The following section illustrates some examples:
# Heading 1 ## Heading 2 ### Heading 3 regular text *italic text* **bold text** [Link Text](https://www.example.com)  1. Ordered List Item #1 2. Ordered List Item #2 3. Ordered List Item #3 - Unordered List Item #1 - Unordered List Item #2 - Unordered List Item #3
Summary
Jupyter Lab is a unique IDE that allows you to build interactive notebooks containing your notes, executable code, calculation results, images, and much more. It’s a fantastic tool for everyone interested in data visualization and machine learning, and it’s perfect for use in lab and classroom environments.
You can install Jupyter using various methods. However, pip and conda are among the most popular, and this article explained how to use pip to download Jupyter. Once installed, you can start Jupyter and access the application using a web browser.
Jupyter Notebooks lets you execute Python code directly. However, the notebook also allows you to define variables and functions to use them throughout programs. In addition, Jupyter supports markdown for formatting text cells, which allows for building beautiful notes alongside the Python code.


