制造商零件编号 2390
PYBOARD V1.1 STM32F405 NO HEADER
Adafruit Industries LLC
Most controllers on the market are coded in languages like C and C++, but thanks to a clever company called George Robotics Limited, you can now code some microcontrollers using the ever-famous Python.
When it comes to programming languages, Python has really taken the world by storm. It is now one of the most popular languages to date thanks to its simple syntax, readable code, powerful features (such as object orientation), and cross-platform nature. For years, Python was restricted to computers, such as PC, Mac, and Linux, but this is no longer the case Python has been made available for microcontrollers!
MicroPython is essentially a slim, efficient version of Python 3 that includes a small subset of the Python 3 libraries. However, before you get carried away, do note that its minimum requirements are 256KB of ROM and 16KB of RAM. This means it will still run on many ARM-based microcontrollers.
There are two ways in which you can get into MicroPython: buy a MicroPython dev board or purchase a simple dev board that uses a compatible processor. In this blog, I’m using a compatible board, similar to the MicroPython Pyboard.
So, the first thing we need to do is connect this and wait for Windows to install the drivers automatically. If you find that Windows does not entirely recognize the device, you can navigate to the Device Manager, locate the unknown device, and then install a new driver by searching automatically online. Windows should know what to install.
Before we can go further, we will also need to install Python 3 and download a script that will allow us to download MicroPython onto the board.
With Python 3 installed, you will also need to install PIP, which allows us to install new libraries and scripts with ease from the command line. Download this python script and then run it. Using PIP, you can now install the esptool by using the following command (you can run this from any directory): pip install esptool.
With esptool downloaded and installed, we now need to get the MicroPython ROM, which can be downloaded here. Once downloaded, place it into a directory, such as your desktop, for ease of access when using the command prompt.
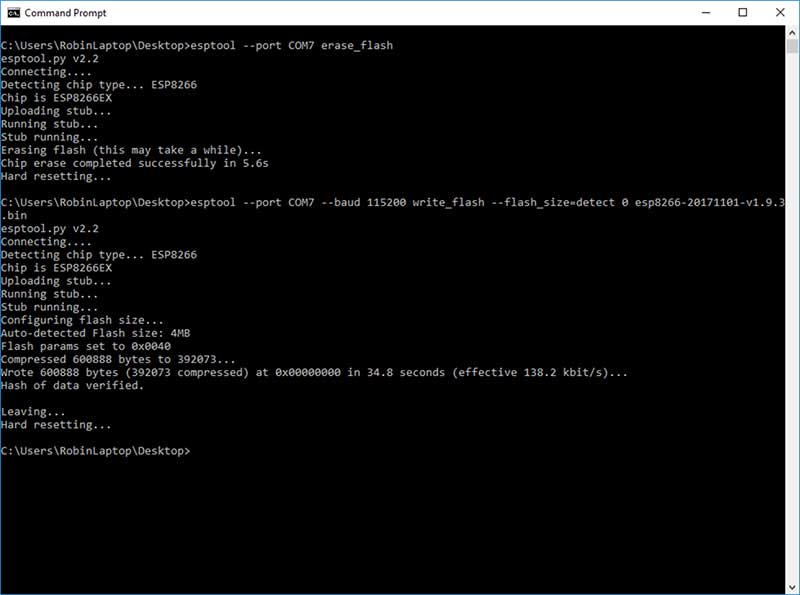
Now for actually flashing the board! Start by connecting your board to the USB port and then wait for the computer to recognize it. Using Device Manager, find out what port number the MicroPython is on and also find out your baud rate. While the port number could be anything, the baud rate is typically 115200 or 9600 (start with 15200 first). Open a command prompt and change the directory to the location of the downloaded ROM. In my case, I copied the file to the desktop, so I did the following in command prompt.

The command to flash the board is rather complex and has several parameters, which we need to supply.
esptool --port COM7 erase_flash
esptool --port COM7 --baud 115200 write_flash --flash_size=detect 0 esp8266-20171101-v1.9.3.bin
While my command says COM7 as the port, you need to replace this with the COM port you found in Device Manager. The baud also needs to be changed to match your device’s baud rate, and the last parameter is the bin file that contains MicroPython. If all works, your device should now be running MicroPython! It is now awaiting your instruction. So, let's have a quick play to make sure it's working.

When MicroPython is installed on the board, it enters a prompt state, where you can enter commands to the device via a serial port. You can also write Python script to two different files, boot.py and main.py, which are executed when the module is turned on. Because of this, you can have your system in a project or product and automatically run (as if it were on a computer).
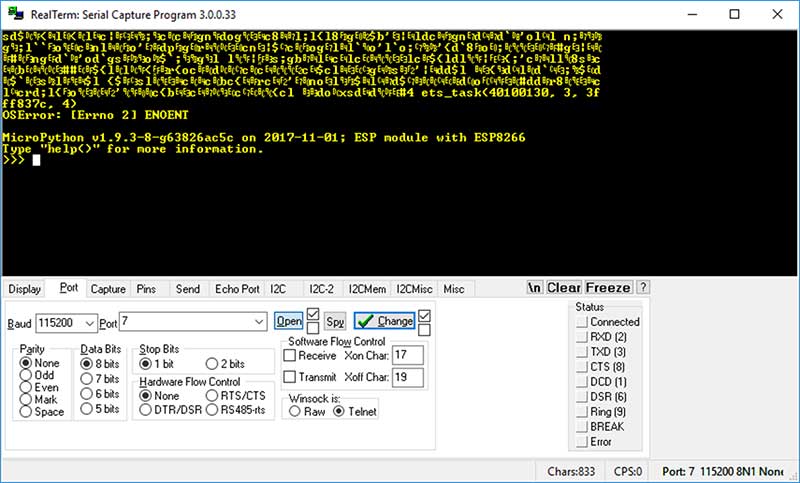
For now, we will send some basic commands to confirm it’s running. Firstly, open a serial prompt of your choice. I recommend using RealTerm since it has some nice features, including display type. So, open the terminal, open the serial port, ensure the correct baud rate is set, and then hit the reset button on your devboard. If all goes to plan, you should see something similar to this:

Now, in the window, type “print(“hello world”)” and hit enter. If the MicroPython is working correctly, it should respond with “hello world”.

While this example may seem simple, MicroPython can, in fact, do many tasks. One massive advantage of Python in this environment is that you have access to GPIO, so Python programs can be more interactive. And if your board has access to Wi-Fi, you can think about making IoT projects with it. That’s not bad for a chip that costs less than a few bucks!