How to Make an Arduino-Based VU Meter
2021-02-03 | By Maker.io Staff
License: General Public License Arduino
This article discusses an introductory Arduino project in which a microphone and amplifier breakout board are used to build a digital VU meter. A VU meter is a device that can visualize the volume of an audio source. In this case, the audio picked up by the microphone is used as the input. The Arduino is employed for its analog-to-digital conversion capabilities.
BOM
This project was built using the following parts:
Part/Qty
- Perfboard or Breadboard – 1
- Arduino Nano Every – 1
- Red LED 5mm – 8
- 220 Ohm resistor – 8
- 5 pin female header (2.54mm pitch) – 6
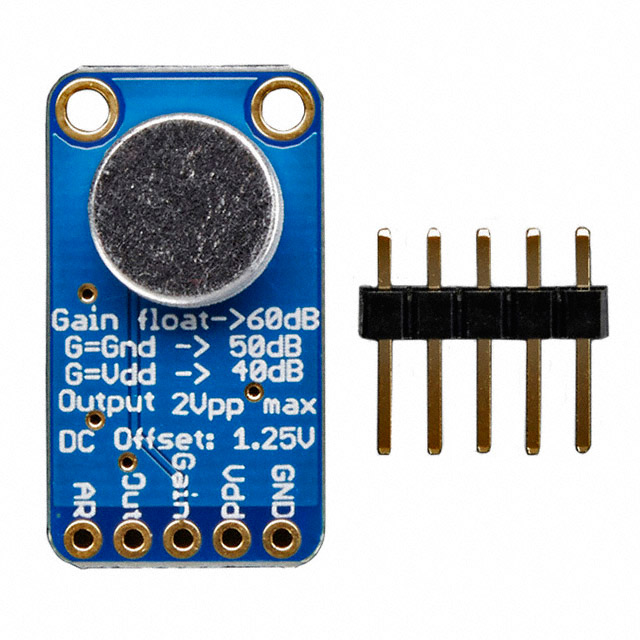
- Microphone breakout – 1
- 10µF capacitor – 1
Note that it’s possible to use a larger number of LEDs to achieve a better effect. To keep the finished product small, we chose to only use eight indicator LEDs. It’s also possible to use LEDs with built-in resistors to further reduce the overall size of the finished project. The capacitor is optional but recommended to reduce the noise on the input signal from the amplification circuit before it’s fed into the analog input of the Arduino. It’s even possible to use other Arduinos. However, the input and output pins have to be adjusted accordingly in that case.
The Circuit Diagram
The following circuit diagram shows how the microphone board and indicator LEDs can be connected to the Arduino Nano Every board:
Note that it’s possible to connect the output of the microphone breakout board to any analog input of the Arduino. Similarly, the LEDs can be connected to any other digital output as well. Luckily, the Adafruit microphone and amplifier breakout board works with supply voltages from three and five volts, so it’s possible to connect it to either voltage supply pin of the Arduino. In this case, we connected the module up to the 3.3 V supply pin.
The GAIN and AR (Attack Response) pins of the microphone breakout board were left unconnected intentionally. Doing so will increase the gain to 60 dB (the sensitivity gets increased). It's possible to connect the GAIN input to the 3.3 V pin or GND if the sensitivity is too high. A potentiometer can be used to make the sensitivity adjustable.
The Software for a VU Meter
Fortunately, doing all of this doesn’t require a long and complicated program. Since the Arduino solely acts as a simple ADC (analog-to-digital converter), the program only comprises a few lines of code:
#define MINIMUM 290
#define STEP 17

int pins[] = {2,3,4,5,6,7,8,12};
int len;

void setup()
{
  pinMode(A0, INPUT);

  len = sizeof(pins) / sizeof(int);

  for(int i = 0; i < len; i++)
	pinMode(pins[i], OUTPUT);

  Serial.begin(9600);
}

void loop()
{
  int val = analogRead(A0);

  for(int i = 0; i < len; i++)
	digitalWrite(pins[i], (val >= MINIMUM + (i * STEP)));
}
The first two lines of the code define a few constant values that won’t change throughout the program. The first one represents the minimum value that has to be read on the analog pin for the first LED to light up.
In our case, the microphone outputs a voltage that corresponds to a value of around 285 when it’s silent. This happens due to static noise and because the circuit on the breakout board will not output 0 V, even in total silence, due to its design. To prevent the first LED from constantly lighting up, it only turns on when a slightly higher value is read on the analog pin of the Arduino.
The STEP defines how much larger the read value has to be for the next LED to light up. So, if the first LED turns on if a value of 290 has been observed, the second LED lights up in addition to the first one if that value exceeds 307 (290 + 17), the third LED turns on if the read value is greater than 324 (290 + 17 + 17), and so on.
The setup function initializes the analog pin as an input pin, and all the output pins, defined in the pins-array, get initialized as outputs. The loop method reads the state of the analog pin, and it stores a value between zero and 1023 in the val variable. This value represents the observed loudness. Then, the for loop turns on the LEDs according to the example from above. The for loop iterates over all elements of the pins array and turns each LED on or off depending on the observed value.
Visualizing the Analog
This Arduino VU meter is incredibly simple to build. The project is especially useful for beginners, as it visualizes the state of the Arduino’s analog pin in an easy-to-understand way. For that, a microphone and amplification breakout board get connected to an analog pin of the Arduino. The Arduino sketch only contains a few lines that initialize the input and output pins, and that turn the LEDs on if the input value exceeds a certain threshold. There are other applications for this how-to that we’ll return to in upcoming articles, so keep this knowledge handy as we keep building on these ideas in the near future!


