Tiny Geckos Display Small Energy Footprint
投稿人:Convergence Promotions LLC
2012-08-29
With the rapid rise of battery-powered consumer and embedded applications, developers now have a wide range of low-power microcontrollers from which to choose. This usually comes down to a "pick your peripherals and choose your trade-offs" decision, with the trade-off of power versus performance being the most painful and the most difficult to track, especially on the software side. Energy Micro's ARM® CortexTM-M3 processor-based, EFM®32 Tiny Gecko MCUs attempt to minimize the pain, at the same time enabling developers to monitor the energy consumption of each of their blocks of code in order to identify and eliminate “energy vampires” during the design process.
Energy Micro makes six different Gecko product lines, including the ARM Cortex-M0 processor-based Zero Gecko; the ARM Cortex-M3-based Tiny Gecko, Gecko, Leopard Gecko, and Giant Gecko; and finally the ARM Cortex-M4-based Wonder Gecko. Each of the Gecko products share the same basic architecture, though obviously with increasing amounts of flash and RAM. DigiKey has a series of videos that helps sort all this out.
The Energy Micro EFM32-TG-STK3300 Tiny Gecko Starter Kit is based on the EFM32TG840F32 (see Figure 1) running at 32 KHz. The chip comes with 32 Kbytes of flash, 4 Kbytes of RAM, 56 GPIO pins, an eight channel DMA controller, and an eight channel peripheral reflex system (PRS) for autonomous inter-peripheral signaling while the processor core is asleep or shut down.
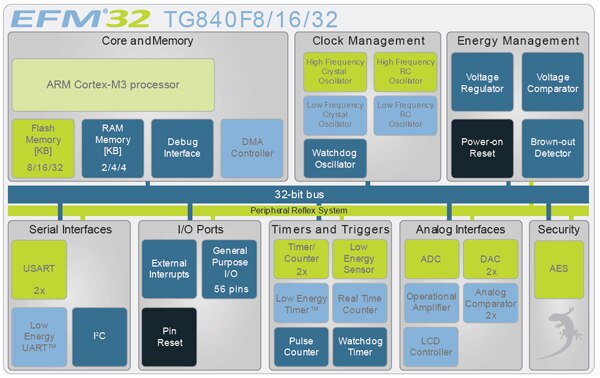
Figure 1: EFM32TG840F32 block diagram (Courtesy of Energy Micro).

Figure 2: Tiny Gecko power modes (Courtesy of Energy Micro).
Clearly, the Tiny Geckos were developed with low-power wireless sensor networks in mind. They incorporate an LESENSE low-energy sensor function block that can autonomously monitor up to sixteen external sensors, regardless of type. They also include a 12-bit ADC that consumes 350 µA at 1 Msamples per second; an 8 x 36-segment LCD controller drawing 0.55 µA; and a low-energy UART using only 150 nA at 9600 bps.
Getting started
Energy Micro’s EFM32 Tiny Gecko Starter Kit is a platform for rapid prototyping of ultra-low-power microcontroller applications. While marketed as a ‘starter kit’ the board – in combination with the Simplicity Studio software and supplied IAR tools – this device can serve as a launch pad for some sophisticated projects. The kit comes with a board support package (BSP), which is a set of C source and header files that enable you to control numerous features and functions from your own application code. Use of the BSP is optional, since you can use all of the peripherals in efmlib and control the MCU without it.
Opening the box, the kit is fairly straightforward. It contains the kit PC board, IAR Embedded Workbench for EFM32 Kickstart Edition (fully featured, but limited to 32 Kbytes code size), a USB cable, a Get Started card with a link to the software you need to download, and a Titanium Gecko-shaped combination keychain and bottle opener that has since disappeared into our kitchen. The kit board (see Figure 3) looks pretty tiny itself – at least small, at only 5.5 x 11 mm – fitting easily into the palm of your hand. The unspoken question – “Could I actually do something useful with this?” – starts to answer itself when you look at some of the peripherals included on the board. These include a 160-segment LCD screen, a touch slider, an ambient light sensor, an LC sensor, and an internal temperature sensor. Almost all of the peripherals are accessible from breakout pads along the top and bottom edges of the board, where you can solder a 100 mil-pitch pin header if you decide to get serious. In addition, two pushbuttons and an LED are available to use in applications. The board comes with built-in, full-featured J-Link technology from Segger Microcontroller Systems. All of this can be powered either by the USB cable or a CR2032 coin cell.
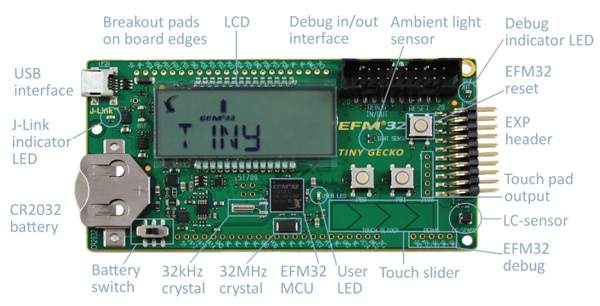
Figure 3: Energy Micro EFM32 Tiny Gecko Starter Kit board (Courtesy of Energy Micro).
Tracking energy usage
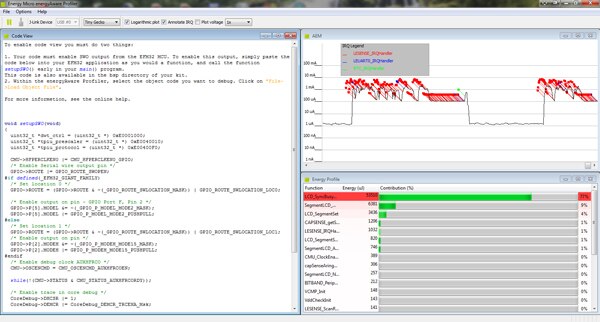
One of the board’s unique features is the Advanced Energy Monitor (AEM). This is basically two current sense amplifiers that measure the voltage drop over a small series resistor and translate that into a current rating that is displayed by the energyAware Profiler shown in Figure 4. Each amplifier is adjusted for current measurement in a specific range. Together, they are able to measure currents ranging from 0.1 µA to 50 mA – a 114 dB dynamic range. Each time the kit is started up, the AEM automatically calibrates, compensating for the offset error in the sense amplifiers.
The touch slider demo highlights Energy Micro’s unique energyAware Profiler, which shows not only the current consumption of the MCU in real-time, but the energy consumption of each individual function (see detail in Figure 5). In this demo, the system is drawing only 1 µA in quiescent mode, though when you watch the energyAware Profiler trace in real-time, it is clear that this does not count current to the two blinking LEDs. When touching the touch slider at any point, the results are a steady 100 µA. Moving your finger along the touch slider causes the current to swing between 100 µA and 2 to 3 mA. The code module consuming the most energy during this demo is LCD_VBoostSet, drawing 77 percent (53,510 µJoules). The energy profile is updated every 100 samples and is sorted by energy.
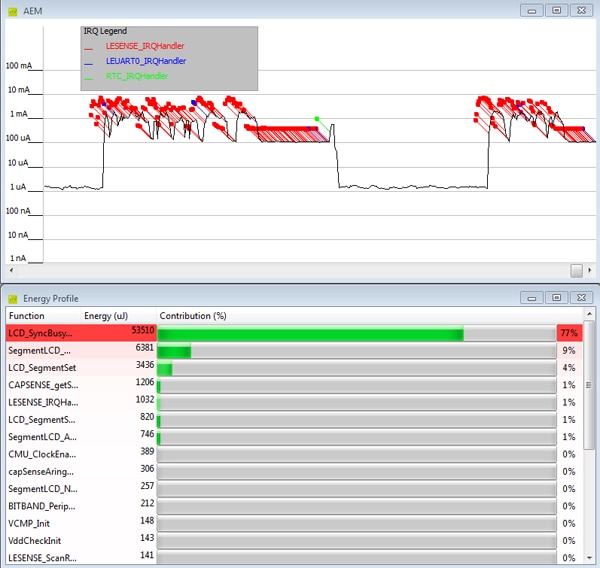
Figure 5: energyAware Profiler detail.
You can watch the energy consumption of all forty-seven different code modules that constitute this program change in real-time as the program executes – providing some seriously useful, real-time feedback on how your code is performing. Clicking anywhere on the graph will result in highlighting in the Code View panel (see Figure 4, left) the line of code that was executing, updating the status bar with a current consumption, voltage, PC, time, and current IQ for that specific point.
The Code View panel shows the code you are executing, though in this example it is showing the C code for setupSWO(void), which you need to copy and paste into your own code to enable serial wire output (SWO), from which the energy profiler gathers its information. Once you do that – obviously with a compiler and debugger already running – you can then select the object code you want to debug (“File→Load Object File”) and go after the energy vampire that the profiler identified.
Hands on
After installing Simplicity Studio and checking out the demo programs, the next step is to install an IDE that supports the board. The kit comes with IAR Embedded Workbench for EFM32 Kickstart Edition, which installed easily after downloading numerous updates. There are separate project files and source code for other popular IDEs, including the Keil MDK-ARMTM, Mentor Graphics’ Sourcery G++, and Rowley Associates’ CrossWorks for ARM. While I have Keil tools installed and a ULINK2 debugger – which plugs nicely into the board’s debug socket – I chose to stick with the IAR tools, despite not having a separate Segger JTAG emulator. In practice, it turned out that the on-board J-Link debugger was more than adequate for anything I had in mind.
Getting started with the IAR tools was easy – until it wasn't. Energy Micro makes all of their tools plus IAR's available from Simplicity Studio. So I clicked on IAR and started the Embedded Workbench; then clicked on Example Projects→Energy Micro→EFM32TG_STK3300→Touch Demo→Open Project. It wanted to open a project I had worked on earlier using a very different board and processor. That led to a search for the right project, which was not where previous experience would lead me to believe. Taking a tip from the kit’s user manual – always the last place to look – I thought I had found what I needed neatly hidden away at: C:\Users\[username]\AppData\Roaming\energymicro\kits\EFM32TG_STK3300\examples\touch\iar
I only found an empty folder. Frustrated, I downloaded the kit software (example code, BSP, and drivers), unzipped the package, and manually copied the kit folder with all its subfolders and files to where the Workbench expected to find them. That worked.
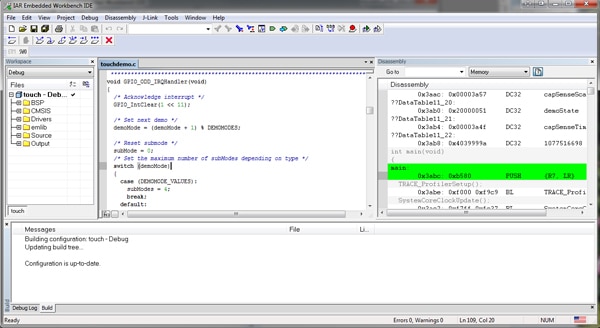
I selected the Touch project example we looked at earlier in this article. Clicking on the Make Project icon led to a successful outcome, as did clicking on the Download & Debug icon (see Figure 6). Clicking on the Go icon started the program running. From this screen you can only verify that by running your finger along the touch strip, but that gave plenty of output readings on the LCD screen.
Next, I went back to the Simplicity Studio home screen and opened the energyAware Profiler, selected Tiny Gecko, checked J-Link Device (USB #0 was already selected), selected File→Load Object File, loaded the object file I had just created, and clicked on the Run icon. It worked, much to my satisfaction if not surprise, showing basically the same screen as Figure 4, except that this time the Code View window was showing em_lcd.h and not the canned code that shows up when you run the demo.
The only problem was that the program was consuming a steady 1.2 mA in a resting state. Reading the FAQs online, someone had reported this problem and the bottom line was, “Reset the board.” Pressing the handy Reset button solved the problem. Now the quiescent current was back to approximately 1 µA and the active current of 2 to 3 mA. Clicking anywhere on the graph highlighted the relevant line of code in the Code View pane.
Energy Micro recommends using each of the example programs that come with the kit as a framework for developing applications that need that particular functionality. Using the suite of well-integrated tools that come with the kit, it would seem to provide a fast start for a wide range of ultra-low-power sensor applications.
Summary
Energy Micro’s EFM32TG840F32 is an ultra-low-power microcontroller well-suited to battery-powered sensor applications. The EFM32-TG-STK3300 Tiny Gecko Starter Kit makes it easy to evaluate this chip in practical applications, and then go on to develop them using the kit board and software. The energyAware Profile that comes with the kit is an especially useful tool for identifying in real-time code that needs attention in order to be more energy efficient.

免责声明:各个作者和/或论坛参与者在本网站发表的观点、看法和意见不代表 DigiKey 的观点、看法和意见,也不代表 DigiKey 官方政策。


