PandaBoard Simplifies Development of Mobile Applications
投稿人:Convergence Promotions LLC
2013-04-03
When open-source software first started appearing, engineers were skeptical and commercial software companies were hostile. However, quality carries the day, and today Linux – supported by an enormous open source community – runs on everything from all but the smallest embedded devices to the largest supercomputers. The open-source Eclipse framework has made possible a huge number of inexpensive software development tools for embedded developers. Today, there is hardly a commercial EDA tool that does not support Eclipse. Over time, both software and hardware companies became converts, impressed by the enthusiasm and capabilities – not to mention the sheer size – of the open-source engineering community.
While engineers might have access to free OSs and tools, non-trivial hardware development platforms had always been pricey – and proprietary. At Linux World in 2008, DigiKey introduced the $149 BeagleBoard, a single-board computer (SBC) that was smaller than a drink coaster. The board was an open development platform based on TI’s OMAP3530 applications processor, which featured a 600 MHz ARM® Cortex™-A8, a 2D/3D graphics engine, and a high-performance TMS320C64x+ DSP processor core. Designed to foster open-source software development, the board was (and is) sold under a Creative Commons license and has generated a thriving development ecosystem at beagleboard.org.
If the BeagleBoard is not quite what you have in mind you can scale down to the BeagleBone – based on a 700 MHz ARM Cortex-A8 with fewer on-board peripherals but a lot of third-party add-ons. Meanwhile the original BeagleBoard has been upgraded to the current BeagleBoard-xM (see Figure 1) with a 1 GHz ARM Cortex-A8, 512 MB LPDDR RAM, a 4-port USB 2.0 hub, HDI video support, and a lot more. While this article is not about the Beagle Board, if you are interested in learning more, check out the BeagleBoard-xM product training module on DigiKey's website.

Enter the Panda
While the BeagleBoard is a powerful development platform, it is still a general-purpose SBC. In 2010, recognizing the need for an open development platform targeting mobile applications, Texas Instruments introduced the PandaBoard, which it has subsidized and promoted to the developer community.
How is the Panda different from the Beagle? According to TI, the BeagleBoard is meant to be used as a prototyping vehicle for product development, whereas the PandaBoard was designed to be a vehicle for embedded software development – in particular for projects targeting battery-powered mobile devices such as cell phones, where TI has long marketed OMAP™ devices.
Why does TI say that the BeagleBoard is designed for product development and the PandaBoard is only for software development? The BeagleBoard uses single-core ARM Cortex-A8 OMAP 3/DM3730 processors, which are catalog parts that you can buy from DigiKey for use in your projects and products. However, the advanced dual-core OMAP 4 SMP processors used in the PandaBoards are not catalog TI parts so they are typically not available to purchase in low volumes. You can use the PandaBoard to develop the next killer app for high-end smart phones and tablets aided by detailed technical information on the chips and a large open-source support community. You just will not be able to build a competitive smart phone at home in your spare time (at least not using an OMAP 4).
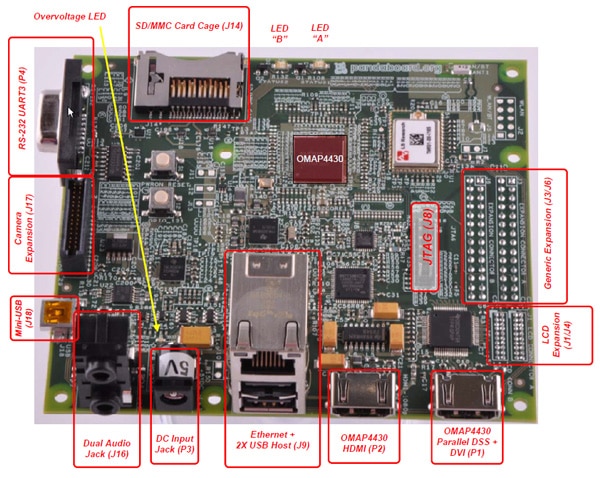
The original PandaBoard (see Figure 2) is built around a TI OMAP4430 containing a dual-core ARM Cortex-A9 MPCore™ with both cores running at up to 1 GHz. Also onboard are a PowerVR™ SGX530 GPU, a C64x DSP, and 1 GB of LPDDR2 DRAM. The graphics processing capabilities in particular were well in advance of those on the original BeagleBoard (since upgraded in the –xM).

The PandaBoard does not spare on peripherals: providing 10/100 Ethernet, USB 2.0 (device, host, and OTG), stereo audio in and out, Wi-Fi and Bluetooth transceivers, USB 2.0 host and OTG, and dual-display output (LCD with DVI-D and HDMI connections). The board supports full 1080p30 multi-standard record and playback using an OpenGL® ES v2.0 graphics engine. There is also an expansion header to accommodate a video camera.
The newer PandaBoard ES ups the ante by using an OMAP4460 running a dual-core ARM Cortex-A9 MPCore™ SMP processor with each core running up to 1.2 GHz, a PowerVR SGX540 GPU with two times the performance of the SGX530, 1 GB of DDR2 SDRAM, 802.11 b/g/n (based on TI’s WiLink™ 6.0), Bluetooth® v2.1 + EDR (based on WiLink 6.0), while being Bluetooth Low Energy capable. There are expansion headers for I²C, LCD, and a camera. You can debug programs on the board via JTAG and UART/RS-232.
The main differences between the PandaBoard and PandaBoard ES are:
- PandaBoard ES uses OMAP4460 silicon versus OMAP4430 silicon on PandaBoard (up to 1.2 GHz versus 1.0 GHz)
- PandaBoard ES uses the TiWi-BLE module with support for Bluetooth Low Energy (versus TiWi-R2 module on the PandaBoard)
- PandaBoard ES uses the TPS62361 part to power the VDD_MPU instead of TWL6030
- PandaBoard ES has the DSI signals brought out on the back of the board (DSI signals were not exposed on the 4430 PandaBoard)
- PandaBoard ES has a sysboot switch to control the boot order
- Audio-in is connected to auxiliary inputs (AFML/R) on Phoenix on PandaBoard ES (not HSMIC as in 4430 Panda; adds support for stereo input use cases)
Getting up and running
When you open the PandaBoard box, you will find a PandaBoard and some packing material – no install disk, Getting Started Guide, or another USB cable. Cold water for Windows® users.
Here's a not so short list of what is not in the box:
- 5 V power supply
- SD card 4 GB+
- USB to serial adapter or serial cable
- Ubuntu (10.04+) host PC is recommended, but any Linux Debian-based system will work
- RJ45 Ethernet cable
- USB cable (mini-A to type-A USB)
- DVI (HDMI type-A to DVI-D) or HDMI (type-A to type-A)
- USB keyboard
- USB mouse
- Display with HDMI or DVI support
After a short trip to Radio Shack (and upgrading to Ubuntu 12.04 LTS on my notebook) I was ready to begin.
For this project, I chose Ubuntu Precise 12.09, and to keep life simple I downloaded the Linaro binary image. Unfortunately, my older notebook does not have an SD card slot, so I downloaded the .gz file again to my Windows 7 PC and unzipped it. I used ImageWriter for Windows to transfer the resulting image file to an 8 GB SD card, which I transferred to the SD card slot on the PandaBoard. I connected all the cables, but was instructed not to power up just yet.
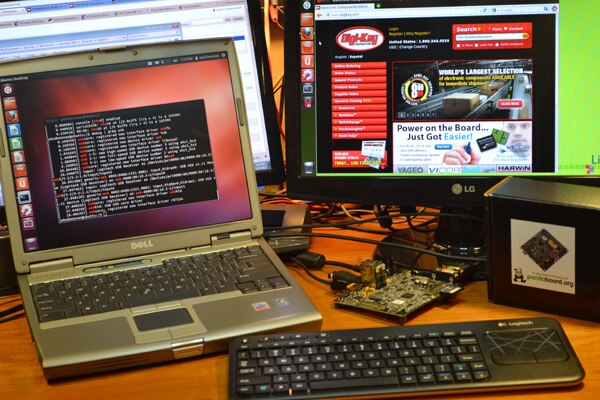
The next step was to install Linux (preferably Ubuntu) on my PC. Install an upgrade to the latest version, check. Install the Minicom communication package there according to the instructions on OMAPpedia. Check. Well, actually a bit of work preceded that ‘check’ – basically setting up the serial terminal to operate correctly. For the purposes of this article it did not really matter, since the next step was to power up the board and press the reset button. It worked perfectly, as shown in Figure 3. I love pre-built binaries.

Figure 3: Linux running Firefox on the PandaBoard.
If you decide to run Android instead of Ubuntu, things get a little more complicated, but only slightly. Download the binaries from Linaro, flash them to the SD card, set up communication between the PC and the PandaBoard, and type in some boot arguments from the terminal (there are some release specific arguments). Then boot up and you are off and running.
If you decide to download and compile the source code for either release then things get considerably more complicated. But you are an engineer – you knew that.
Once you are up and running you can go to omappedia.org for resources, ideas, and support, which is a wiki maintained by TI and the developer community. It is a great place to find source code for your projects. For example the WiLink RM Radio shows how to create a GUI-based FM radio using the Android FM Framework. There are gits and code locations for everything you need, including the complete TI FM radio stack and library.
Summary
The PandaBoard is an inexpensive, flexible, full featured platform for mobile software development. With all of the I/O capabilities built into the board – not to mention the expansion headers – it is hard to imagine an application you could not develop using this platform.
Other Links:
- Beagleboard.org
- Ubuntu and Android
- Linaro binary image
- ImageWriter for Windows
- OMAPpedia
- Omappedia.org
- WiLink RM Radio

免责声明:各个作者和/或论坛参与者在本网站发表的观点、看法和意见不代表 DigiKey 的观点、看法和意见,也不代表 DigiKey 官方政策。


 中国
中国