Connecting the Photon to IFTTT
2016-03-15 | By Maker.io Staff
Connecting the Photon to IFTTT
By far the easiest way to connect your Photon to the cloud and control your electrical devices is using the IFTTT platform. IFTTT stands for “if this then that” and does exactly that. IFTTT is a Web service that allows you to link real-time information to your Photon board. The platform works by users creating recipes such as “if my favorite football team scores, then send me an e-mail”. IFTTT is also well integrated to popular Web platforms such as Twitter, Facebook, Google Mail, and many more. The IFTTT platform can integrate with our Photon board such that if some action is triggered, such as temperature, motion, or any data from other sensors, then you can define what to do next, such as sending a tweet or an e-mail to someone. This is the basic principle of how the IFTTT platform works, and next we’ll be taking a closer look at how we can connect this service to your Photon board.
Register your IFTTT account
Before we get started, you need to register an account with IFTTT, which is completely free, from https://ifttt.com/ . Once you have registered your details, you can get started with writing your very own recipes to do all sorts of weird and wonderful things. IFTTT also give users options to share recipes so you, too, can share your recipes with the world—after all, we should be great believers in open source.
As previously mentioned, IFTTT integrates into a lot of Web services such as Facebook, Twitter, and Google Mail. If you want to use these services in your recipes, you need to grant IFTTT access to these through the APIs. Feel free at this point to explore all the other applications that are available to you, as well as read some getting started instructions, which also would be useful - maybe try out a few of the existing recipes before we get started to get a feel for how it works.
Twitter Alert using Seeed Grove Modules with the Photon
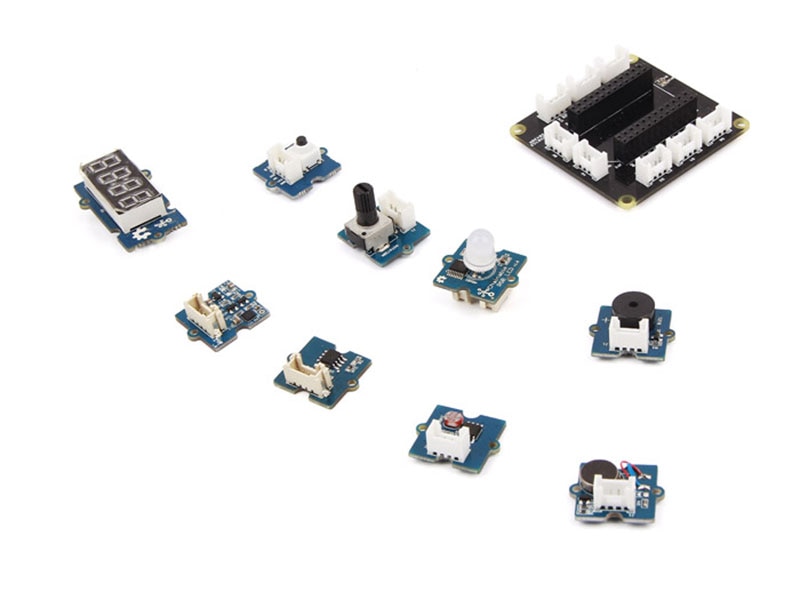
We are going to look at how you can use a Web service such as Twitter to trigger something to happen using the Photon board. For this example, we are going to be using the SeeedStudio starter kit for the Photon. Its uses a building block approach to electronics, which is great for users with little to no experience of electronic circuits. The Grove system consists of a base shield and some modular blocks; in our instance, the Photon kit comes supplied with the following parts:
- Grove Base Shield for Photon Board
- Grove – Button
- Grove – Buzzer
- Grove - Rotary Angle Sensor
- Grove - Temperature Sensor
- Grove - Light Sensor
- Grove - Chainable RGB (red, green, blue) light-emitting diode (LED)
- Grove – 3 Axis Digital Accelerometer (±1.5 g)
- Grove – 4 Digit Display
- Grove - Vibration Motor
- User’s Manual
In this example using IFTTT, every time someone mentions you on Twitter, the vibration motor will come on twice for 500ms, alerting you to the tweet. To get started, go ahead and insert the Photon board into the Grove Photon shield as shown in the figure below, making sure the orientation is correct.
Figure 1: Grove Base Shield For Photon & Accessory Boards

For this example, we are going to be using the Grove vibration motor. Connect the Grove vibration motor to connector A4 on the Particle shield as shown in figure 2.
Figure 2: Connecting the Grove Vibration motor to the Photon shield

The sketch for this example is simple. We create a function that IFTTT passes through a value. We then check the value to see if it matches and then indicate that we want to turn the vibration motor on. The sketch for this experiment is as follows:
- #define MOTORPIN A4
- pinMode(MOTORPIN, OUTPUT);
- Spark.function("Twitter", twitter);
- }
- void loop() {
- }
- int twitter(String command)
- {
- if (command == "buzz")
- {
- digitalWrite(MOTORPIN, HIGH);
- delay(250);
- digitalWrite(MOTORPIN, LOW);
- delay(250);
- digitalWrite(MOTORPIN, HIGH)
- delay(250);
- digitalWrite(MOTORPIN, LOW);
- return 1;
- }
- else return -1;
- }[cr1]
First we need to define the pin that we are going to use on the Photon board; the vibration motor is connected to analog pin 4.
- #define MOTORPIN A4
Next in the setup function we set the motor to an output and create a Spark function that we can pass data though from IFTTT. Remember that the Spark function name cannot be longer than 16 characters.
- pinMode(MOTORPIN, OUTPUT);
- Spark.function("Twitter", twitter);
We ignore the loop function because when the spark function is called, it initializes the twitter function. The Spark function passes through a string value called command, and we check to see if this value is equal to “buzz,” then write the motor to HIGH for a split second before turning it off. If the function does not equal the value of "buzz", then the function returns -1 as failed.
- int twitter(String command)
- {
- if (command == "buzz")
- {
- digitalWrite(MOTORPIN, HIGH);
- delay(250);
- digitalWrite(MOTORPIN, LOW);
- delay(250);
- digitalWrite(MOTORPIN, HIGH);
- delay(250);
- digitalWrite(MOTORPIN, LOW);
- return 1;
- }
- else return -1;
- }
Now that you have your Photon set up and running, you can turn your efforts to the IFTTT Web service. Log in to your account and create a new recipe. You are going to use Twitter as a trigger, at this point you may be prompted to authenticate your Twitter account and be asked to give permission for IFTTT to use the Twitter Web service. On the trigger page there are quite a number of different types of triggers that you can choose from—the one we will use for this example is “Twitter mentions of you.” Whenever your Twitter ID is tagged in a tweet, this will trigger the events in the recipe. Select “New Mention Of You” and proceed to the next step. Here there is nothing to add, so click Create Trigger. Now you can move on to the next step of setting up the “That” section of the recipe.
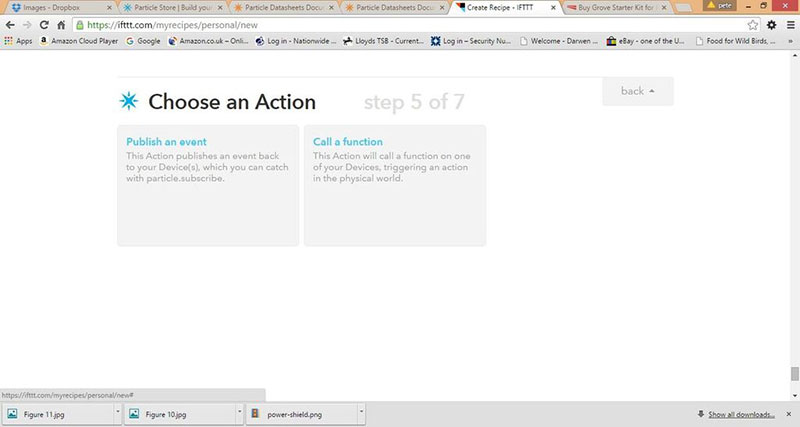
Click the Particle icon from the list of action sources, and you will see a list of actions that can be done with your Photon, as seen in Figure 3.
Figure 3: Photon actions

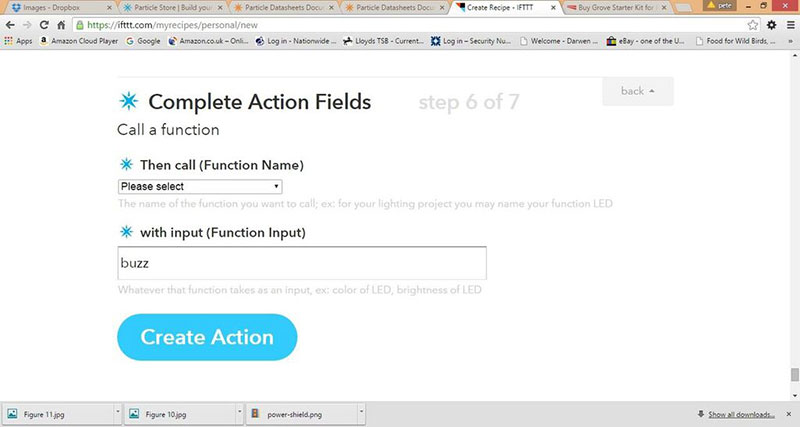
Select the option "Call A Function", and you will be asked to complete a list of action fields to set up the action. From the "Then Call" drop-down list you should see a list of functions that have been setup on your Photon board, if it is connected. You should see in this drop-down box a function called Twitter, which we set up in our code on the Photon. Delete the contents of the action field "with input" and type in this field "buzz," which is going to be the value that we will pass through to our Photon board when the Twitter service has triggered, as shown in Figure 4.
Figure 4: Photon action fields

Click "Create Action" and then click "Create Recipe" and that's it - we now have everything ready and set up; all we need to do is test the scripts and recipe. To test the project, all you need to do is mention yourself in a tweet or get someone else to do it for you. When IFTTT notices this and checks the Twitter feed, it will then trigger the Photon to vibrate the motor. The IFTTT Web service will check Twitter every 15 minutes, so you may have to wait a few minutes until it triggers the Photon board. At this point you can feel free to play around with the different types of triggers that are available using the Twitter Web service, such as when you tweet something or when you have a new follower on Twitter.
EDITED

Have questions or comments? Continue the conversation on TechForum, DigiKey's online community and technical resource.
Visit TechForum


 中国
中国