


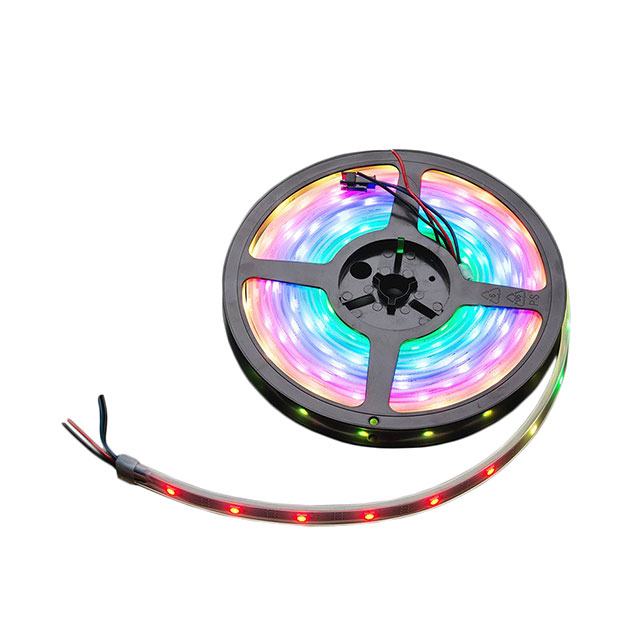
制造商零件编号 1376
ADDRESS LED STRIP SERIAL RGB 5M
Adafruit Industries LLC
License: See Original Project
I’m not sure why, but I’ve long loved building hobby projects involving LEDs. As I often say, “Show me a flashing LED and I’ll show you a man drooling.” More recently, I’ve become interested in adding motion and orientation sensing to my hobby projects. In fact, I just added this capability to a 12x12 array of ping pong balls, each equipped with a tricolor LED.
But perhaps I should start at the beginning. Sometime around spring 2020, I was email-chatting with a retired engineer friend named David Humrich in Australia. David told me that he’d purchased a small matrix of tricolored LEDs and asked me for suggestions as to what he could do with it. In reply, I posted a short video of a simple worm program I’d implemented a few years ago on an 8x8 LED array.
Creating this video for David reminded me that one of my “back-burner” projects was to build a larger array. I’ve seen some very interesting displays based on ping pong balls, so that’s what I decided to do. I started by purchasing a big bag of cheap-and-cheerful ping pong balls, which I mounted in a 12x12=144 array (Figure 1).
Figure 1: Yours truly proudly holding his 12x12 array of ping pong balls, each containing a tricolor LED. (Image source: Max Maxfield)
When it comes to the LEDs, a great choice for this type of project is the WS2818 three-channel LED driver-based NeoPixel from Adafruit, such as a 1376 strip with 30 NeoPixels per meter. This five-meter strip gave me 150 pixels: 144 for the array, one to act as a voltage level converter, and five for spares. I chopped the strip up into single pixel pieces and attached one pixel to the back of each ping pong ball.
I ended up wiring my pixels in a serpentine (zig-zag) pattern starting in one corner and working my way back-and-forth across and up the array. In reality, if you decide to build your own array, it doesn’t actually matter in what order you wire your own pixels because the way we think of this array is as 12 columns (X axis) and 12 rows (Y axis), both numbered from 0 to 11, with pixel [0,0] in the lower left-hand corner (when facing the array). Thus, when we come to write a program to drive our array, we include a function called something like GetNeoNum() that accepts X and Y values as arguments and which — using an algorithm that depends on the way in which we wired the array — returns the number of the corresponding pixel in the string.
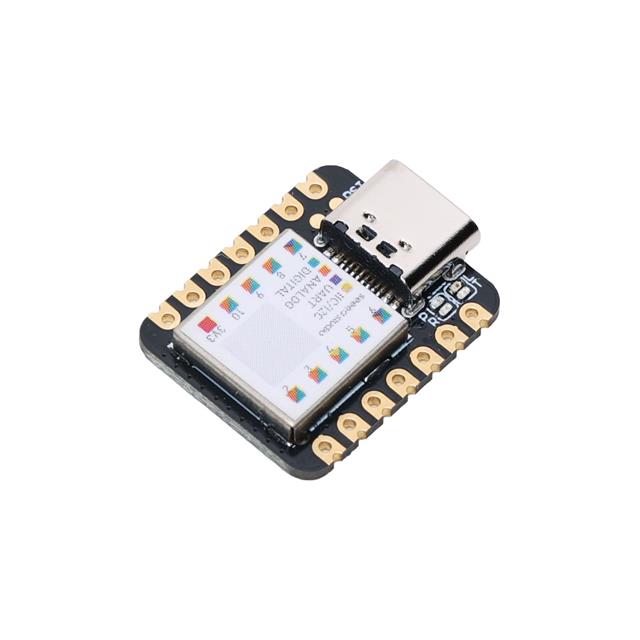
When it came to driving this array, I needed a microcontroller with a reasonable amount of memory, a relatively fast clock, and a substantial amount of processing “umph” because I planned on implementing some interesting effects, including multi-color fades. I opted for the 102010328 Seeeduino XIAO from Seeed Technology (Figure 2). The XIAO, which is powered by an ATSAMD21G18A-MUT SAMD21G18 microcontroller from Atmel, is only the size of a standard postage stamp, making it the smallest Arduino-compatible microcontroller development board in the Seeeduino family. The microcontroller features a 32-bit Arm Cortex-M0+ processor core running at 48 megahertz (MHz) and comes with 256 kilobytes (Kbytes) of flash memory and 64 Kbytes of SRAM.
Figure 2: Currently the smallest Arduino-compatible microcontroller development board in the Seeeduino family, the breadboard-friendly Seeeduino XIAO provides users with a powerful 32-bit Arm Cortex-M0+ processor running at 48 MHz. (Image source: Seeed Studio)
Each of the XIAO’s 11 pins can be used as an analog input, a digital input, or a digital output. Ten of the pins support pulse-width modulation (PWM), and one is equipped with a digital-to-analog converter (DAC), thereby allowing it to provide true analog output capability. Additionally, if required, pins 4 and 5 can be used to support an I2C interface, pins 6 and 7 can be used to support a UART interface, and pins 8, 9, and 10 can be used to support an SPI interface.
As I noted earlier, I’ve recently become interested in adding motion and orientation sensing to my hobby projects. As a test case, I decided to add this capability to my 12x12 ping pong ball array.
What I wanted was a small breakout board (BOB) with a microelectromechanical systems (MEMS) sensor, where that sensor contained a 3-axis accelerometer, a 3-axis gyroscope, and a 3-axis magnetometer. It didn’t take me long to realize that the complexities associated with trying to manipulate and make sense of raw sensor data would cause my brains to leak out of my ears. As an alternative, I opted to use Adafruit’s 2472 BOB, which features a 9-degrees of freedom (DoF) BNO055 sensor from Bosch.
Figure 3: In addition to a 3-axis accelerometer, 3-axis gyroscope, and 3-axis magnetometer, the BNO055 sensor on Adafruit’s 2472 BOB also includes an Arm Cortex-M0 processor that performs sensor fusion. (Image source: Adafruit)
The BOB communicates with the XIAO microcontroller using a two-wire I2C interface. The great thing about the BNO055 is that it also contains a 32-bit Arm Cortex-M0+ processor which takes the raw data from the three sensors, performs sophisticated sensor fusion, and provides me with the data I need in a form I can use. As we see in this video, my first test was to hold my array horizontally, and then make a “ball” (pixel) “roll” around the display by tilting the array.
Conclusion
This first test actually worked much better than I expected, but in reality, it’s rather simplistic. All I’m doing is detecting when the array’s tilt passes a certain value (currently set to 10 degrees) and then making the “ball” move in the corresponding direction at a constant speed. The next step will be to more accurately model things like inertia and acceleration, and then use these capabilities to implement a series of games.
The main thing is that these first-pass experiments have inspired me to start adding motion and orientation sensing to other projects, thereby making them even more bodacious than they already are. How about you? Do you have any hobby projects that would benefit from the ability to detect how they were moving and in which way they were orientated?

Have questions or comments? Continue the conversation on TechForum, DigiKey's online community and technical resource.
Visit TechForum


 中国
中国