An Overview of Makecode and Getting Started With micro:bit
2018-08-10 | By Maker.io Staff
The micro:bit is a small microcontroller designed to make microcontroller projects easy and entertaining. In this how-to article, we will look at getting a micro:bit running on MakeCode, a programming platform for the micro:bit.
Things You Will Need
- micro:bit Essentials Kit
- Mini USB lead
- PC with internet access and a spare USB port
MakeCode
Making programs for most microcontrollers involves an IDE installed on a local machine and some knowledge of a programming language. While the micro:bit can be programmed in a similar way, it is much easier to use MakeCode which is an entirely online programming environment made by Microsoft. One of the amazing features of MakeCode is that instead of using a scripting language to create a program you use jigsaw-like pieces which perform a variety of functions including logical testing, variable setting, loops, hardware reading, and more. These jigsaw pieces only fit together in specific ways, helping you prevent mistakes and errors in code. To demonstrate this, we will make a program that will blink some LEDs on the front of the micro:bit!
To load MakeCode visit the website below:
https://makecode.microbit.org/
Once loaded you should be presented with a layout similar to the one shown below:
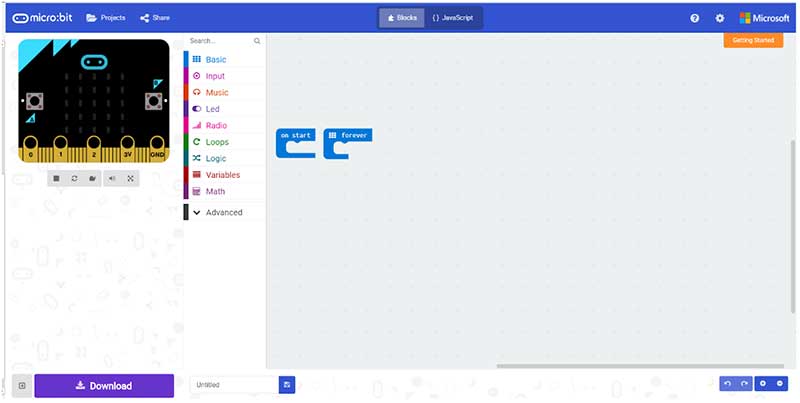
In this empty project, you can see two jigsaw pieces: “on start” and “forever”. When the micro:bit first turns on, it runs any instructions attached to the “on start” piece and when those instructions have been done, the micro:bit will run any code attached to the “forever” piece. The “on start” piece only gets executed once but the “forever” piece is constantly running, so once all the code has been executed in the “forever” piece, it gets executed again and again forever! In our project, we do not need the “on start” piece, so we will click it and then press the delete key.
To the left of the main area is a list of items including Basic, Input, LED, and Logic; these contain pieces that allow us to enter commands and instructions for our micro:bit to run. There are many different functions available here, so we will only be concerned with the instructions that will be used in this project.
First, click Basic and then drag the “show LEDs” piece into the main area. Then drag the “pause” piece into the main area as shown in the picture below:
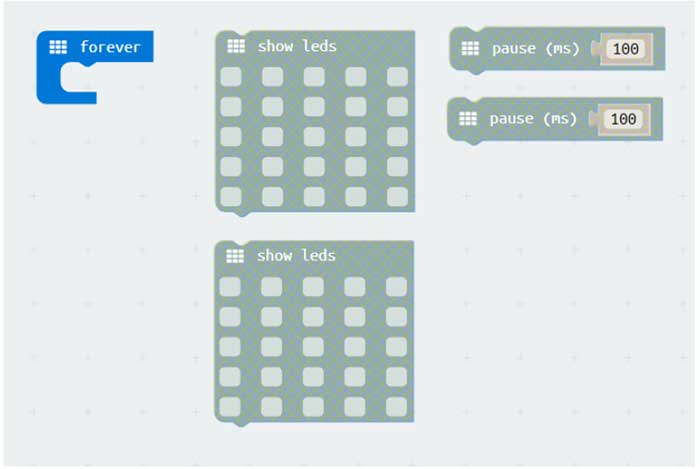
The next step requires us to make a copy of the “show LEDs” piece so we have two copies. Click the “show LEDs” piece and then press Ctrl + C and then Ctrl + V. We will need to do the same for the “pause” piece.
Now it's time to create the program, which is where the brilliance of MakeCode kicks in. Our micro:bit’s first task is clearing the screen so that no LEDs are on. To do this, we drag one of the “show LEDs” pieces into the forever piece.

Now we need to drag in the other pieces to make the program shown below:
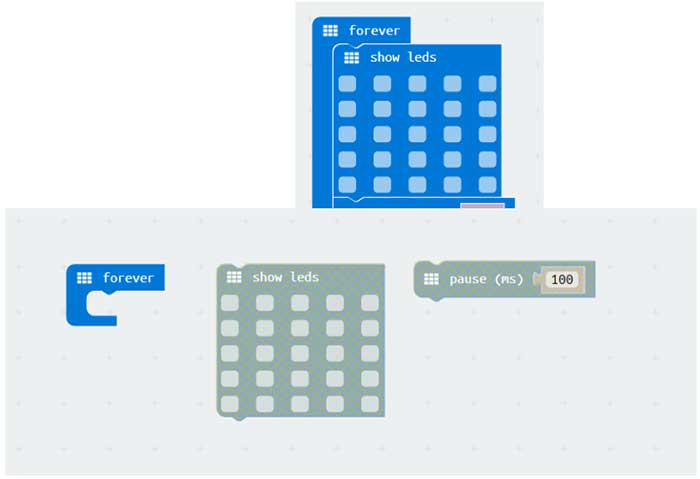
The last step involves filling our LED pattern into the second “show LEDs” piece and then setting the pause lengths to 1 second. Since these are millisecond delays, we will enter 1000 into these pieces.
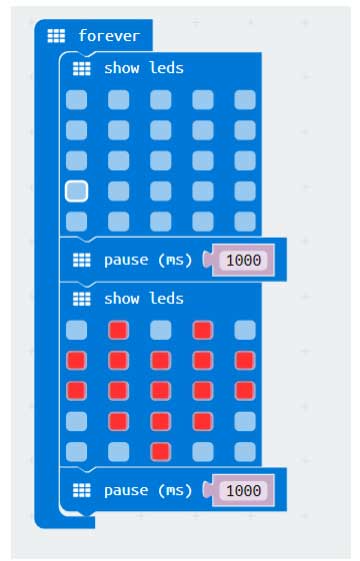
Now that our program has been made we can click the “Download” button to download our program file, which we use to instruct the micro:bit what to do! The download button can be found in the bottom left window of the MakeCode IDE.

Programming the micro:bit
The last stage involves programming the micro:bit. As it turns out, it’s the easiest thing on the planet; it's as simple as dragging files onto a flash disk! Plug your micro:bit into the PC and wait for any necessary drivers to install. Once the micro:bit has been recognized you should see the micro:bit appear on the computer as a removable disk. Navigate to this disk and keep it open.
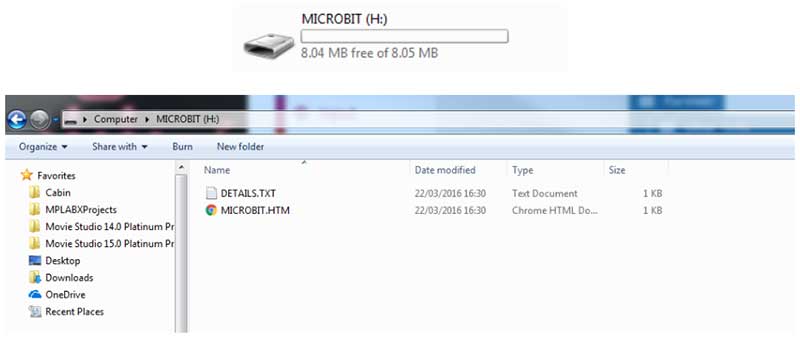
With this folder open, all that’s left for us to do is navigate to our downloads folder and drag across the file that we downloaded from the IDE. Once the file has finished transferring, the micro:bit automatically restarts and runs your program!
Conclusion
It is amazing how simple the micro:bit can be to program. Yet at the same time, the device has some rather complex hardware including an accelerometer, compass, and even some basic sound output capabilities! While it may not offer the power of a PIC32 or STM32 ARM microcontroller, it certainly is a fantastic and fun prototyping platform.

Have questions or comments? Continue the conversation on TechForum, DigiKey's online community and technical resource.
Visit TechForum


 中国
中国