制造商零件编号 SC0022
SBC 1.2GHZ 4 CORE 1GB RAM
Raspberry Pi
Streaming video from the Raspberry Pi has been quite a hot topic with users wanting to stream Live video from nature reserves or bird boxes and even live Raspberry Pi events. The Raspberry Pi 3 is the perfect platform for a number of reasons. Firstly, the Raspberry Pi has the ability to encode video directly using the hardware chip in H264 format as opposed to slow software encoding, which can also be poor quality.
Recently I agreed to look into how to stream a live event using the Raspberry Pi from a close friend who runs events and workshops. There was a number of platforms in contention to stream to including UStream, Twitch, YouTube amongst others. UStream offers a free basic account but to stream video in HD they charge $99 a month so this option was out of the question. Twitch specifically only allows streaming for Gaming videos so this was also out of the question. YouTube Live streaming offered the best flexibility, they allow HD streaming for up to 8 hours long in one session and best of all its free, you are only required to verify your YouTube account before enabling the Live feature.
To create a new live event YouTube gives you a rtsp:// URL which you can stream to using your own unique key, including a public URL that you can give out to other users to view anywhere in the world.
What you will need
For this example, I used the Raspberry Pi 3 as it had built-in WiFi but you can use any other version of the Raspberry Pi as long as you have a way to connect to the internet using either WiFi or Ethernet.
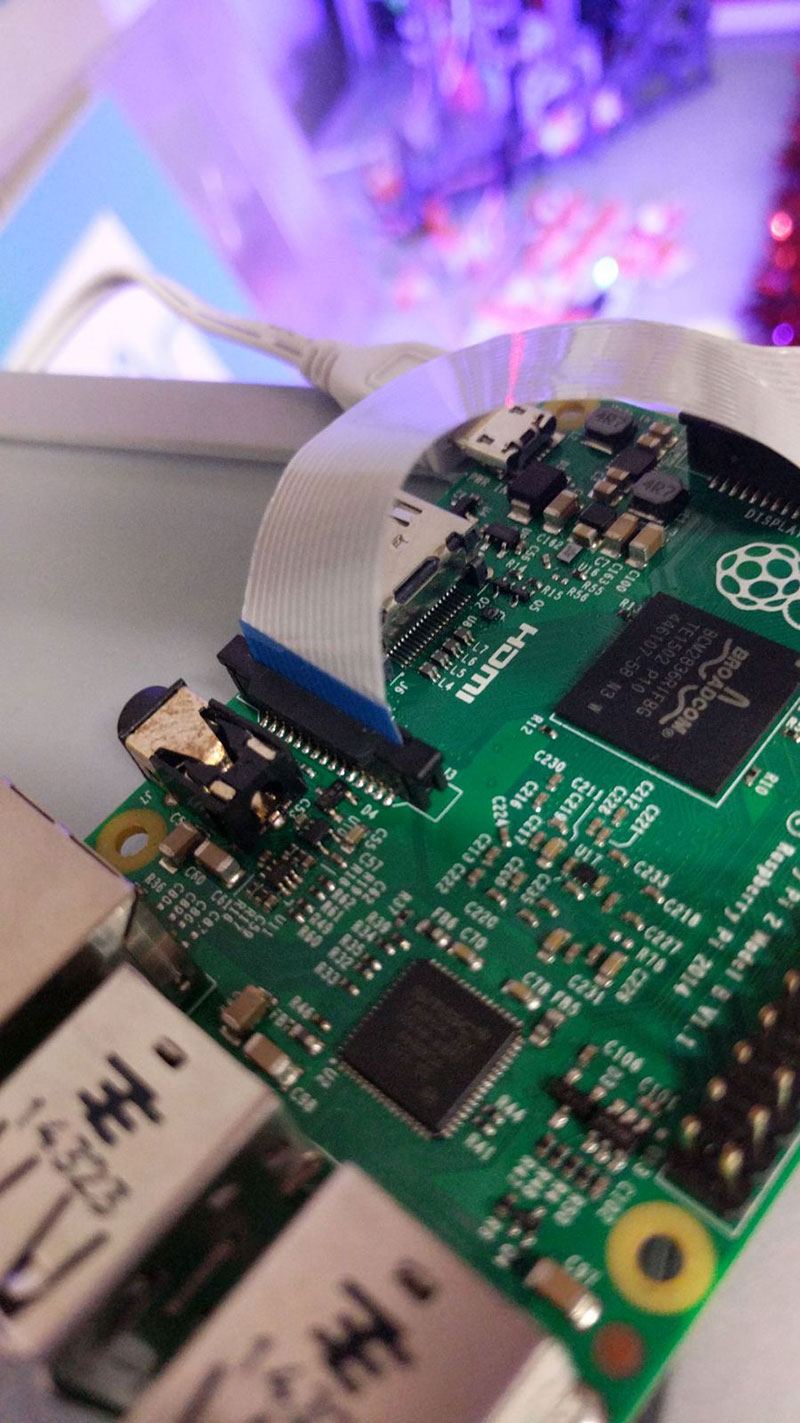
Before powering up the Raspberry Pi, you will need to do two things. First, connect the Raspberry Pi camera into the CSi slot on the Raspberry Pi. You can see in the below figure the correct orientation of the ribbon cable inserted into the CSi slot.

Connecting the Raspberry Pi Camera to the CSi Slot
You will also need to download and install a copy of the latest version of Raspbian on to a Micro SD card for the Raspberry Pi to boot. You can download a copy from the Raspberry Pi foundation website.
Once inserted the Micro SD card you can apply power to the Raspberry Pi. Once booted you will need to enable the Raspberry Pi camera and also enable SSH if you wish to remotely access the Raspberry Pi. You can do this by opening up a terminal window and running the Raspberry Pi configuration program:
sudo raspi-config
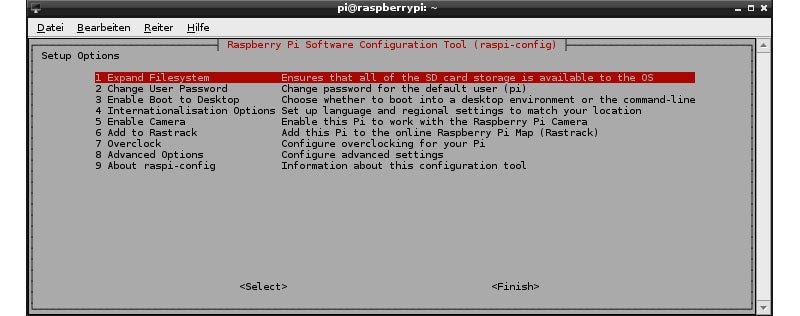
In the Raspberry Pi configuration menu, you can enable the Raspberry Pi camera, which is disabled by default. Save the settings and reboot the Raspberry Pi.

Enable the Pi Camera in raspi-config
If you are using Ethernet to connect to your Internet connection, then you can connect your Ethernet cable to your Raspberry Pi. If you are using WiFi either the on-board WiFi or a USB dongle, then you can follow the maker.io guide to getting connected here.
Now that we have a internet connection and the Raspberry Pi powered up with the Raspberry Pi camera connected, we can now go ahead and install ffmpeg, which we will use to encode the stream to YouTube in FLV format. FLV is a flash video container used to deliver videos over the internet using Adobe Flash Player.
By default, ffmpeg is not listed in the Raspberry Pi repository when running ‘sudo apt-get install ffmpeg’. You will have to manually add a new repository to the source list in /etc/apt/sources.list:
sudo nano /etc/apt/sources.list
Add the following line to the list:
deb http://www.deb-multimedia.org jessie main non-free
Update the list of available packages:
sudo apt-get update
Install ffmpeg:
sudo apt-get install ffmpeg
YouTube Streaming
Now that you have everything installed on the Raspberry Pi, you are almost ready to launch a live stream to YouTube. You will initially be required to sign up to a YouTube account if you haven’t done so already and you will also be required to enable and verify your account for live streaming.
From the YouTube home page, you will need to navigate to the following:
My Channel > Video Manager > Live Streaming

Click My Channel

Click Video Manager

Click Live Streaming
From this point on you may be prompted to verify your YouTube account using either SMS or an automated telephone message with a verification code. From the Live streaming page on your YouTube account you can retrieve your ‘Stream name/key’ under ‘ENCODER SETUP’, click reveal and this will show your unique streaming key which you will need to make a note of, enable to stream from your Raspberry Pi to the YouTube account.

Stream Key and URL
Now head back to your Raspberry Pi terminal window and enter the following command to stream live video feed from your Raspberry Pi camera to YouTube, adding your key to the URL:
raspivid -o - -t 0 -vf -hf -fps 10 -b 500000 | ffmpeg -re -ar 44100 -ac 2 -acodec pcm_s16le -f s16le -ac 2 -i /dev/zero -f h264 -i - -vcodec copy -acodec aac -ab 128k -g 50 -strict experimental -f flv rtmp://a.rtmp.youtube.com/live2/STREAM-KEY
If you stream is working you should see an output similar to that in figure 7.

Live Streaming output
Facebook Live
Facebook Live uses the same streaming method as YouTube, by creating a unique RTMP URL to stream you content to. All you need to do is create a stream URL using Facebook Live by following these steps taken from https://www.facebook.com/facebookmedia/get-started/ .
First, login to your Facebook page and select ‘Publishing Tools’ in the top navigation bar. On the left menu, click the ‘Video Library’ under the videos section.

Facebook Publishing tools
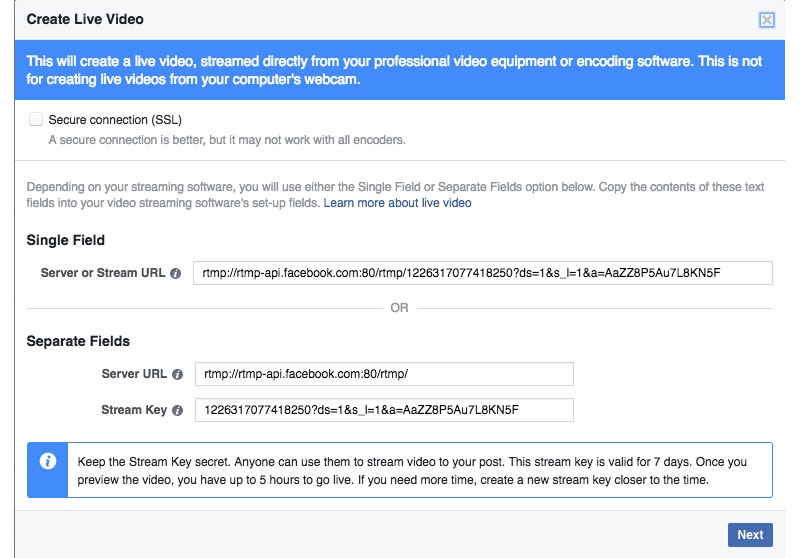
Click on the ‘+ Live’ button to begin configuring you live stream. For this example you will only require a single field stream URL.

Create Live Video
The server URL and Stream Key can only be used for a single Live preview or Live post connection. The URL and unique key are also only valid for a 7-day period for additional security measure. Make sure you take a copy of the RTMP stream URL which you will use in your Raspberry Pi.
Press the 'Preview' button to configure the Live Post and to also preview the encoder stream output from the Raspberry Pi. At this point you can start the stream on the Raspberry Pi using the following command, much similar to the one we used to stream to YouTube replacing the URL with the one you copied from Facebook:
raspivid -o - -t 0 -vf -hf -fps 10 -b 500000 | ffmpeg -re -ar 44100 -ac 2 -acodec pcm_s16le -f s16le -ac 2 -i /dev/zero -f h264 -i - -vcodec copy -acodec aac -ab 128k -g 50 -strict experimental -f flv rtmp://rtmp-api.facebook.com:80/rtmp/STREAM-KEY
Going back to Facebook click the 'Preview' button to configure the Live post and to preview the stream output from the Raspberry Pi, it will take between 1-10 seconds for the stream to be previewed. Add the video title and topic tags if required. By default the 'Go Live' button remains disabled until Facebook detects a stream input.

Create Live Video
In the advanced options you can change the duration of your live stream to unlimited as opposed to the default stream of 4 hours. Changing this would be suitable for live streams of aquariums, museums or even Zoo's.
Now everything is setup you can go ahead when ready and press the ‘Go Live’ button to stream Live on Facebook.
The Break down
The following is the command broken down into sections, each part of the terminal command is configuring the live feed into a video format to send to YouTube or Facebook.
All this streaming is also dependant on your internet bandwidth, you may see some considerable delays in Live Streaming as well as poor quality. YouTube will also give you an indication as to the level of quality that is coming into the live feed. There are a couple of variables in which you can change in the above command such as frames per second and bit rate, which could reduce the bandwidth feed to YouTube and decrease the delay slightly. It’s worth playing around with these settings to find something that it balanced for your needs.
Also note that some network firewalls be block the RTMP outgoing port TCP 1935. You may want to forward this port in your firewall. Please refer to your router manual in order to do this.