DKAN005A PWM Example
投稿人:DigiKey
2011-01-11
Microchip Technology's CCP module is included in a variety of PIC microcontrollers, such as the PIC12F683. This document familiarizes users with PWM generation using Microchip's CCP module. It also describes a dimming application using the OPA731W light engine from TT Electronics/Optek Technology.
Application
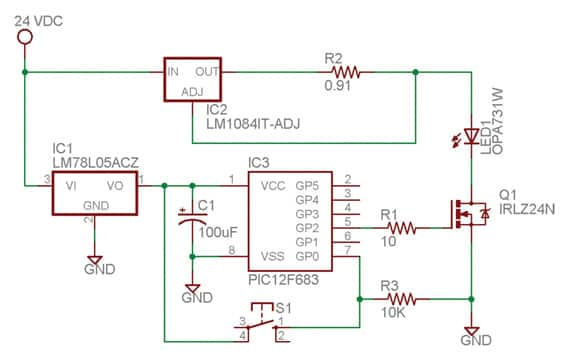
The circuit shown in Figure 1 controls the intensity of an LED array by adjusting the duty-cycle of a 100Hz PWM waveform. The waveform produced by the PIC12F683 microcontroller is used to drive an N-channel logic level MOSFET in order to supply ground to the LED array. Current limiting to the array is accomplished on the high side utilizing a linear voltage regulator configured as a constant current source. The microcontroller monitors a pushbutton switch. The duty-cycle increases and decreases between limits while the switch is pressed. As the duty-cycle changes, it is continuously stored in EEPROM, which allows the circuit to retain the light intensity when powered down.

Figure 1: Example circuit.
Hardware Overview
The PIC12F683-I/P has a CCP module and software configurable internal oscillator which make it suitable for this application. The CCP module is used to generate the free-running PWM waveform. Also, its internal 8 MHz oscillator, which can be divided down via software to one of eight distinct clock frequencies, allows for flexibility in the waveform period.
The light array requires a minimum of 18 V at about 1.4 A to obtain full intensity. The PWM output controls an N-channel logic-level MOSFET (IRLZ24N) to provide ground to the light array. The high side of the light array is supplied using an adjustable voltage regulator (LM1084IT-ADJ), configured as a constant current source. The voltage regulator is set near the 1.4 A maximum current requirement to produce approximately 960lm of light from the array. To prevent excessive power dissipation and overheating in the current limiting regulator, the supply voltage is relatively close to the forward voltage of the array.
Software Overview
Calculations
Depending upon the particular application, a suitable PWM frequency needs to be selected. In the case of driving an LED array with a pulse, it is necessary to take into account the persistence of vision of the human eye and generate a frequency above the 60Hz "bright light" flicker fusion threshold. For the purpose of this discussion, a 100Hz frequency is used. The PR2 register value determines the PWM period, while the value of register CCPR1L and bits 4 and 5 of the CCP1CON register determine the duty-cycle.
As shown in Equation 1, the PWM frequency is determined by the PR2 and TMR2 registers in conjunction with the internal oscillator frequency.

Where fPWM is 100Hz, TMR2 is a prescale value of 1, 4, or 16, and fOSC is one of the eight distinct clock frequencies. Table 1 shows the values of PR2 that yield a fPWM of 100Hz given different combinations of TMR2 and fOSC. Since PR2 is an 8-bit register, it is limited to a maximum of 255.
| TMR2 | ||||
| 1 | 4 | 16 | ||
| f OSC (MHz) | 8.000 | Invalid | Invalid | Invalid |
| 4.000 | Invalid | Invalid | Invalid | |
| 2.000 | Invalid | Invalid | Invalid | |
| 1.000 | Invalid | Invalid | 155.25 | |
| 0.500 | Invalid | Invalid | 77.13 | |
| 0.250 | Invalid | 155.25 | 38.06 | |
| 0.125 | Invalid | 77.13 | 18.53 | |
| 0.031 | 76.50 | 18.38 | 3.84 | |
Table 1: Possible values for PR2.
In choosing a PR2 value of 156 (0x9C), fosc is set to 1MHz and TMR2 is 16. This is accomplished by setting the Internal Oscillator Frequency Select bits (IRFC<6:4>) of the OSCCON register to 0b100.
While the pulse width resolution is 10-bits, it is necessary to determine what resolution is available for a given PWM period using Equation 2.

When the pulse width is maximum (1 / fPWM = 0.01 s), CCPR1L:CCP1CON<5:4> = 625. Therefore, each step represents a time of 0.01 s/625 = 16µs or a 0.16 percent modulation of the period. This is unnecessary for this LED dimming application. Dropping the two least significant bits and using only the 8-bit CCPR1L register achieves a more suitable 0.64 percent resolution and lower code overhead.
Program Flow
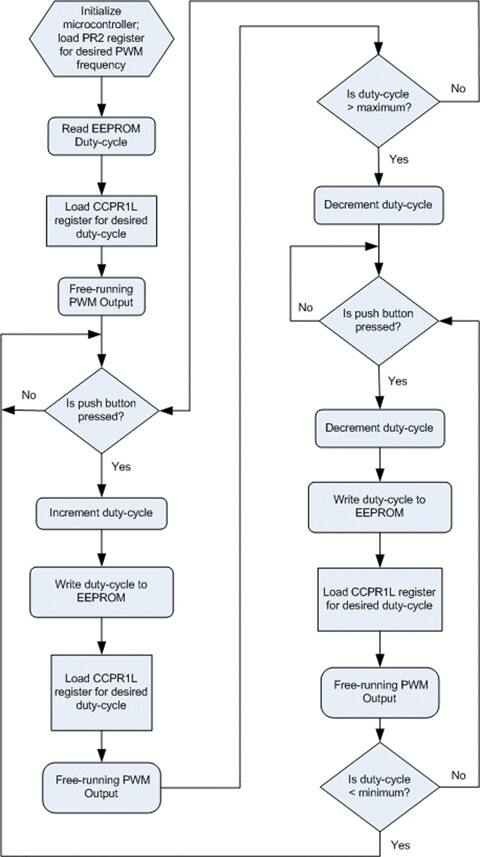
Once the program has properly initialized the microcontroller, it loads a duty-cycle value from EEPROM memory and enables the PWM output. The program then monitors the push-button switch for closure. Upon detecting a switch closure, the software determines whether to increment or decrement the existing duty-cycle, writes the value to EEPROM, loads the duty-cycle value, and enables the PWM output. The flowchart in Figure 2 illustrates the program execution.

Figure 2: Software flowchart.
Conclusion
While this application controls the intensity of an LED array, the general circuit lends itself to many low voltage applications requiring PWM power control. The circuit can be adapted to other applications by setting the required current with the LM1084IT-ADJ and changing the software to produce a desired PWM frequency and duty-cycle.
The source code is available at: Applications Engineering
| Part | DigiKey P/N | Description | Manufacturer P/N |
| IC1 | LM78L05ACZFS-ND | 5V voltage regulator | LM78L05ACZ |
| IC2 | LM1084IT-ADJ-ND | 5A adj voltage regulator | LM1084IT-ADJ/NOPB |
| IC3 | PIC12F683-I/P-ND | microcontroller | PIC12F683-I/P |
| R1 | 10QBK-ND | 10Ω resistor, ¼W | CFR-25JB-10R |
| R2 | P0.91W-3BK-ND | 0.91Ω resistor, 3W | ERX-3SJR91 |
| R3 | 10KQBK-ND | 10KΩ resistor, ¼W | CFR-25JB-10K |
| Q1 | IRLZ24NPBF-ND | N-channel logic level MOSFET | IRLZ24NPBF |
| S1 | SW401-ND | mom pushbutton tact switch | B3F-1002 |
| C1 | P5165-ND | cap 100µF 35V alum electrolytic radial | ECA-1VM101 |
| LED1 | 365-1369-ND | LED array | OPA731W |
Appendix: Parts list.

免责声明:各个作者和/或论坛参与者在本网站发表的观点、看法和意见不代表 DigiKey 的观点、看法和意见,也不代表 DigiKey 官方政策。


