制造商零件编号 3591
HUZZAH32 ESP32 FEATHER MALE HDR
Adafruit Industries LLC
In this how-to, we will learn how to use a 1-Click Motor Controller with Atmosphere IoT Studio.

So far, the Atmosphere IoT Studio platform has been used to interface with sensors mainly surround the IoT field. While this is the main purpose of Atmosphere’s IoT Studio, it can do much more than this. The stepper motor control, which is what the 1-Click Motor Controller allows, is just one add-on in particular that can lead to some very interesting possibilities. This board provides multiple input signals and coil outputs, which can be made to control a stepper motor for precision movement. However, the 1-Click controller board is nothing more than two H-bridges, meaning that it can be used to control two independent DC motors with rotation direction control, but these motors would not be able to be precisely controlled.
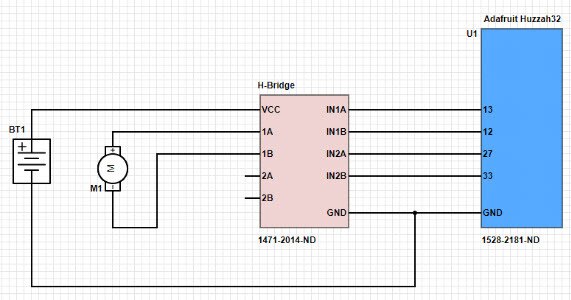
The H-Bridge 1-Click is based on the MC34933 dual H-Bridge controller, and the board includes two output pairs, an external power connector, and a breakout breadboard-friendly board. The board has an onboard voltage level select that must be changed to 3.3V (if not done already), as the Huzzah32 is a 3V device. As previously stated, the two pairs (1 and 2) can all be used on a single bipolar stepper motor for precise movement or to two separate DC motors for directional control. The board requires four input digital signals that determine the polarity of the H-Bridge outputs and therefore requires four GPIO from the Huzzah32 (take note of this when creating projects around this board).
https://www.mikroe.com/h-bridge-click

The maximum current of the outputs is 1A, which is important to keep in mind when connecting external motors.
To use the motor controller element in the Atmosphere IoT Studio, we first need to include it in our element toolbox. To do this, click “Add Element” at the bottom of the element toolbox and then search for “click.” You will need to include the HBRIDGE1CLICK element, which is found at the bottom of the list.

The HBRIDGE1CLICK element has a number of options that need to be changed depending on your design. As stated before, this module requires 4 GPIO to function correctly, and you will need to choose four spare GPIO. In this example, I have chosen 13, 12, 27, and 33, as they are all next to each other on the Huzzah32, therefore making wiring easier.

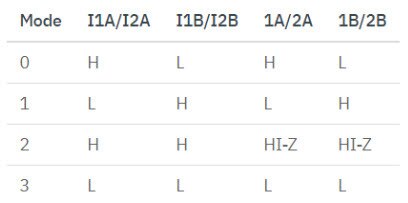
Unlike most other elements, this element is not designed to send information to other elements such as Bluetooth. Instead, this is an element that you assign values to so that the motor step sequence can be controlled. Each pair of coil outputs can be controlled independently, making the H-Bridge Click board ideal for dual DC motor control such as a wheeled robot, which needs to be able to move forward, backward, turn left, and turn right. Each pair has four modes that it can be set in and the truth table below shows these states. H indicates a high voltage while L indicates 0V.

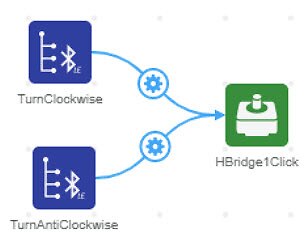
This how-to will use a simple DC motor connected to pair 1 for controlling its direction (clockwise and counter-clockwise). The element is connected to two Bluetooth elements, which represent a command to turn clockwise or counterclockwise. You will notice that there is no interval element driving these Bluetooth elements. This is because the “written” trigger on the Bluetooth is fired as soon as data is received (i.e., it does not require probing by an interval element for the latest data).

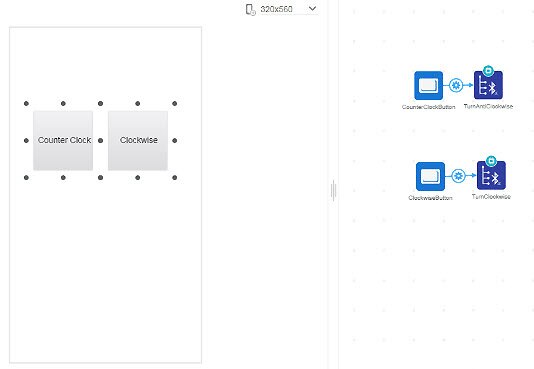
The app is also very simple and consists of two buttons and the two Bluetooth elements found on the device program. The two buttons are used to send the word “GO” to their connected Bluetooth element. When this message is sent to the connected Bluetooth element, the H-Bridge element will rotate in the specified direction. The word that is sent by these buttons is not important, as the Bluetooth elements controlling the H-Bridge only look for an incoming message as opposed to its content. By doing this, it makes programming easier; otherwise, incoming data would need to be parsed and the decoded to send the correct command.

The H-Bridge element here has been used in a trivial manner to control DC motors, but the main purpose of this board is to control bipolar stepper motors. Connecting a bipolar motor to the H-Bridge module is easy and only uses four wires; however, controlling the steps may be tricky on the Atmosphere IoT Studio. While there is no wrong way of doing this, the best method would be to use the counter element to increment a set number of times, and, depending on the value of the counter (using the comparison element), the proper stepper state can be sent to step the motor. The image below shows a simple example of how this can be achieved.
